What Are the Steps of a Professional Microneedling Treatment Protocol?
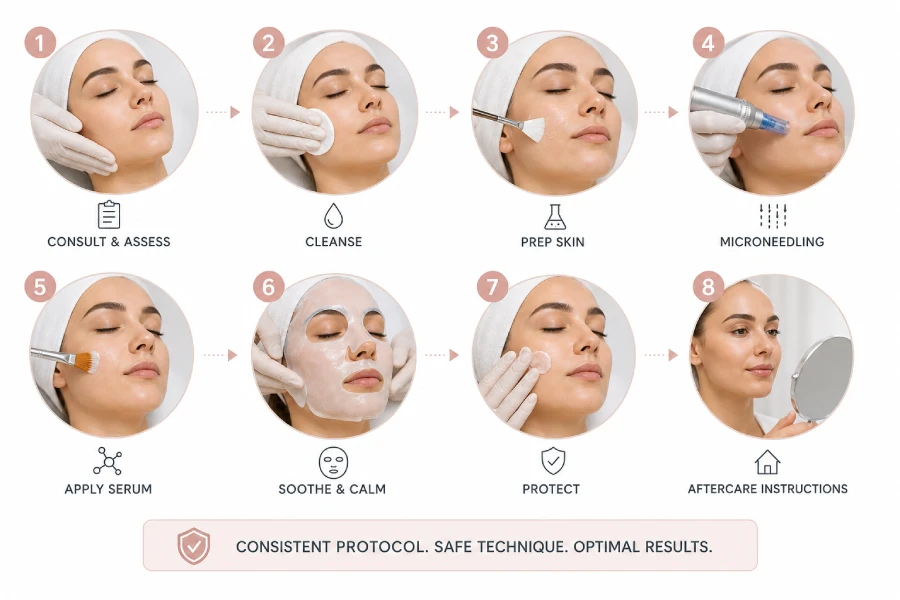
A professional microneedling treatment protocol consists of seven sequential phases: consultation and contraindication screening, double-cleanse and degreasing, topical anaesthetic application and removal, treatment serum application, systematic device passes by zone, immediate post-treatment recovery, and structured aftercare instruction. Each phase has specific timing, technique, and product requirements that together determine safety, client comfort, and clinical outcome.
- Contraindication screening must occur before every treatment—not just at the initial intake consultation—because client health status can change between appointments.
- The skin must be fully degreased before device passes: any residual oil, sunscreen, or product film interferes with glide and causes uneven channel depth.
- Topical anaesthetic typically requires 20 to 45 minutes under occlusion to reach effective dermal depth; starting treatment too soon is the leading cause of preventable client discomfort.
- Needle depth is not uniform across the face—periorbital and perioral zones require significantly shallower settings than the cheeks and forehead.
- Two to three directional passes per zone (vertical, horizontal, diagonal) distribute channels more evenly than repeated passes in a single direction.
- Re-applying treatment serum between passes maintains glide and ensures actives are delivered directly into open channels at the moment of creation.
- Immediate post-treatment recovery—applied within minutes of the final pass—is critical for managing transepidermal water loss and reducing acute inflammation.
Microneedling produces its clinical results through a combination of controlled mechanical injury and the skin’s subsequent wound-healing cascade. But the quality of that response depends almost entirely on how precisely the treatment protocol is executed. An inconsistent or poorly sequenced protocol does not simply produce suboptimal results—it can produce uneven channel distribution, excess inflammation, prolonged recovery, and in some cases post-inflammatory hyperpigmentation that damages the client relationship and the practice’s reputation.
For estheticians building microneedling into their service menu, a clearly defined, repeatable protocol is the single most important professional asset. It ensures consistent client outcomes, reduces treatment-to-treatment variability, and creates a clinical structure that supports upselling, package sales, and confident pre-treatment consultation. The protocol outlined in this article reflects the sequencing and technique standards used across professional clinical settings where microneedling is performed as a core service.
This article covers every phase of the treatment in clinical detail—what to do, when to do it, and why the sequence matters—giving estheticians a reference framework they can adapt to their device, product line, and client population.
What Every Esthetician Should Know About the Microneedling Treatment Protocol
- Contraindication screening is a pre-treatment clinical step performed at every appointment, not a one-time intake form exercise.
- Double-cleansing with a dedicated degreaser before treatment passes is non-negotiable; residual product film compromises both glide and channel uniformity.
- Numbing timing is the most commonly rushed step in the protocol—under-numbed clients are more likely to move, tense, or refuse future treatments.
- Zone-based needle depth adjustment is essential: periorbital skin is thinner and more reactive than cheek skin and requires a shallower setting.
- Directional pass variation (vertical, horizontal, diagonal) produces more uniform channel distribution than repeated unidirectional passes.
- Treatment serum must be re-applied between passes to maintain device glide and maximise transdermal delivery while channels are open.
- Post-treatment recovery must begin within minutes of the final pass to address acute TEWL elevation before the skin’s repair response closes micro-channels.
Pre-Treatment: Consultation, Contraindication Screening, and Skin Preparation
No microneedling treatment should begin without a structured pre-treatment consultation. This is not a formality—it is the clinical gating function that prevents treatments on contraindicated skin and ensures the esthetician has current, accurate information about the client’s health status. Even returning clients should be screened at every appointment, because conditions such as active cold sores, new prescription retinoid use, recent sun exposure, or recent injectable treatments can all appear between visits and materially change whether treatment should proceed.
The contraindication review should cover active infections, open lesions, or inflammatory skin conditions in the treatment area; history of keloid scarring; current use of blood thinners, isotretinoin (which requires a mandatory waiting period of six to twelve months post-discontinuation), or photosensitising medications; recent laser or chemical peel treatments; pregnancy; and any history of hypersensitivity reactions to topical anaesthetics. Estheticians working in states with expanded scope should also screen for haemophilia and autoimmune conditions affecting wound healing.
Double-Cleanse and Degreasing Protocol
Once the client is cleared for treatment, the skin preparation sequence begins. A double-cleanse approach is standard: the first cleanse removes makeup, SPF, and surface debris; the second cleanse uses either the same cleanser or a dedicated degreaser such as an isopropyl alcohol or acetone-free skin prep solution to strip the remaining lipid film from the stratum corneum. This step is clinically significant. Any residual oil or product film on the skin surface acts as a barrier between the device and the tissue, causing the needles to skip rather than penetrate evenly, producing shallow or inconsistent channels, and increasing device drag in a way that raises client discomfort without increasing treatment efficacy.
After cleansing, the skin should be patted dry with a clean gauze or dry wipe rather than a reusable towel to reduce bacterial contamination risk before the barrier is disrupted.
Topical Anaesthetic Application, Timing, and Pre-Treatment Serum
Topical anaesthetic is applied to clean, dry skin in a thick, even layer across the full treatment area. Most professional-grade formulations use a combination of lidocaine with or without prilocaine or tetracaine. After application, the cream is covered with a thin plastic occlusive film such as cling wrap or a dedicated occlusive dressing to prevent evaporation and drive deeper dermal penetration. This occlusion step is commonly omitted by less experienced practitioners, but it meaningfully increases anaesthetic depth and is worth the extra 90 seconds of setup time.
Timing starts from the moment the occlusive cover is applied. The minimum effective contact time for most lidocaine formulations is 25 minutes, with 30 to 40 minutes recommended for clients with thicker or more keratinised skin, higher treatment depths, or a low previous pain tolerance. When the timer is complete, the anaesthetic is removed completely with wet gauze, and the skin is again degreased to remove any cream residue before device passes begin. Any anaesthetic residue left on the skin alters the treatment environment and can interfere with serum penetration during passes.
Treatment Serum Selection and Pre-Pass Application
Immediately before the first device pass, a treatment serum is applied to the zone being treated. This serves two functions: it provides glide for the device head, and it infuses actives directly into the channels as they are created. The serum must be appropriate for compromised skin—hyaluronic acid, peptide complex serums, and growth factor formulas are the most clinically appropriate choices. Alcohol-based serums, AHAs, BHAs, retinoids, and direct ascorbic acid vitamin C formulas are all contraindicated during active passes because they will enter open channels and provoke a disproportionate irritation response.
Why Timing and Sequence Precision Drive Clinical Outcomes
Topical anaesthetic penetration depth is directly proportional to contact time and occlusion. Lidocaine without occlusion reaches approximately 2 mm depth in 30 minutes; with occlusion the same formulation achieves 3 to 5 mm depth in the same period. For microneedling treatments at 0.5 mm to 1.5 mm depth, adequate anaesthesia requires full occlusion for a minimum of 25 minutes.
The window for transdermal serum delivery through microneedling channels is narrow. Research on micro-channel closure kinetics shows that the majority of created channels begin to close within 15 to 20 minutes of needle withdrawal, with near-complete surface re-sealing occurring within 45 to 90 minutes depending on depth and client skin type. This means serums applied during treatment passes are delivered at maximum efficiency, while products applied more than 20 minutes after the final pass see substantially reduced transdermal uptake.
Immediate post-treatment occlusion—applied within the first 5 to 10 minutes after final pass completion—captures the peak TEWL reduction window before channels begin closing, which is why the post-treatment mask step is sequenced as the first action after device removal rather than after client clean-up.
Device Pass Technique: Zones, Depth, Direction, and Pass Count
The treatment pass phase is where protocol precision has the most direct impact on clinical outcomes. Estheticians should approach the face as a series of defined zones rather than treating it as a single continuous surface. Zone-based treatment allows depth adjustments for thinner skin areas, ensures no zone is over-treated while another is under-treated, and creates a systematic mental map that prevents missed areas—a common error when practitioners work too quickly or without a consistent routing pattern.
The standard zone sequence begins at the forehead, moves to the temples, proceeds to the cheeks (typically the largest zones), then the chin and jawline, and ends at the perioral area. The periorbital zone is treated last if included, at the most conservative depth setting. This sequence means the most sensitive zones are treated when client tolerance has already been established through earlier zones, and any early treatment-session equipment issues have been identified before reaching the highest-risk areas.
Device Angle, Pressure, and Speed
Pen-style microneedling devices should be held perpendicular to the skin surface—at or as close to 90 degrees as the facial anatomy allows—throughout all treatment passes. Angling the device reduces effective needle depth, creates angled channels rather than vertical ones, and increases lateral tissue trauma. Consistent moderate pressure is applied throughout: pressing too hard does not increase collagen stimulation but does increase bleeding and bruising risk, while insufficient pressure produces channels that are too shallow for meaningful dermal remodelling. Speed should be deliberate and even; rapid uncontrolled passes are associated with skip marks and uneven channel distribution in clinical observation.
One of the most consistent observations in high-volume microneedling practices is the difference in post-treatment client experience when the recovery mask is mixed and waiting versus when it is prepared after the device passes finish. When the Poly-Luronic™ Jelly Mask is bowled at the treatment station before the session starts, the transition from final device pass to mask application takes under 60 seconds—which is precisely the window that matters most for reducing acute post-treatment heat and surface tightness. In contrast, practices that apply a standard hydration serum after treatment—even a quality hyaluronic acid formula—consistently report that clients describe more residual tightness and longer visible redness duration, which is mechanistically consistent with the difference between an occlusive mask format and a serum that begins evaporating immediately on compromised skin. The jelly mask’s rapid-set alginate structure creates a sealed film over the treated surface within 2 to 3 minutes of application, maintaining the actives in contact with the skin rather than allowing them to evaporate into the treatment room air.
Six Protocol Execution Errors That Compromise Microneedling Outcomes
Understanding what goes wrong in microneedling protocols is as important as knowing the correct sequence. The following six errors are the most consistently reported sources of suboptimal outcomes, client discomfort, and treatment complications in professional esthetic microneedling practice. Each is preventable through protocol discipline.
Undertiming the Numbing Phase
Starting treatment before adequate anaesthetic contact time is the most common cause of preventable client pain. Lidocaine formulations require a minimum of 25 minutes under occlusion to reach effective depth at the dermis. Starting at 15 minutes because “the client seems okay” is not a substitute for proper protocol timing.
Skipping the Second Degrease After Numbing Removal
Topical anaesthetic creams are emollient-rich and leave a lipid residue on the skin after removal. If this residue is not cleared with a second degreasing wipe before device passes begin, it acts as a lubricant that prevents consistent channel depth and reduces serum penetration during passes.
Using a Single Needle Depth for the Entire Face
Facial skin thickness varies by zone. The periorbital area may be less than 0.5 mm dermis-to-muscle in some clients, while the cheeks can tolerate 1.0 mm to 1.5 mm safely. Using a single depth setting for all zones means either over-treating thin zones or under-treating thick zones—neither outcome serves the client.
Repeating Passes in the Same Direction Only
Passing the device exclusively in one direction (e.g., always horizontal) creates parallel channels that cluster in a pattern rather than distributing evenly across the treatment zone. Alternating between vertical, horizontal, and diagonal passes on each zone produces a more uniform channel density and more consistent collagen stimulation.
Not Re-Applying Serum Between Passes
As the device passes over the skin, serum is displaced and absorbed. By the second or third pass, a dry treatment surface creates friction and reduces device glide, increasing lateral tissue trauma. Re-applying serum at the start of each pass maintains the treatment environment and ensures actives continue to be delivered into freshly created channels.
Delaying Post-Treatment Recovery Application
Post-treatment recovery should begin within 5 to 10 minutes of the final device pass. Waiting until the client is fully cleaned up, photographed, or brought to a reception area means the peak channel-open window has passed and TEWL is already escalating without intervention. The recovery mask should be the first action after device removal—not the last.
Post-Treatment Recovery and Structured Aftercare Instruction
The post-treatment phase begins the moment the final device pass is complete. The skin at this point has a disrupted barrier, elevated transepidermal water loss, and is in an acute inflammatory state that represents both the mechanism of collagen induction and a window of vulnerability. How the esthetician manages this phase determines how quickly the client recovers, whether post-inflammatory complications develop, and how the client perceives the overall treatment experience.
Immediately after the final pass, the treatment surface is gently cleared of any residual serum or pinpoint bleeding with sterile gauze or a saline-dampened pad, using light dabbing pressure rather than wiping movements. The calming post-treatment mask is then applied without delay. The mask sits for its full contact time—typically 10 to 15 minutes—during which the esthetician can set up for cleanup, complete treatment notes, or prepare the aftercare instruction materials.
Mask Removal and Immediate Post-Mask Protocol
When the mask contact time is complete, it is removed and any residual product is gently cleared from the skin. At this stage, a light, fragrance-free, alcohol-free moisturiser formulated for compromised or sensitised skin may be applied as a final step. SPF is not applied in-treatment-room if the client will be going straight home or to a low-sun-exposure environment, but it is mandatory if the client has any sun exposure on the way out. Clients should be advised that their skin will appear red to erythematous for 12 to 48 hours depending on treatment depth and individual recovery speed.
Aftercare Instruction: What to Tell Every Microneedling Client
Verbal aftercare instruction should be supported by a written card or handout that the client takes home, because information communicated immediately post-treatment is poorly retained. The core aftercare instructions cover: no active skincare (retinoids, AHAs, BHAs, vitamin C) for a minimum of 72 hours; no heat exposure (saunas, steam rooms, hot yoga, vigorous exercise) for 24 to 48 hours; gentle fragrance-free cleanser and moisturiser only for the first 72 hours; SPF every morning without exception starting the day after treatment; no makeup for at least 24 hours (48 hours preferred); and to contact the practice immediately if any unusual heat, swelling, or breakout develops after 48 hours. Estheticians should also use this conversation to schedule the next appointment while the client is still in the room, reinforcing the recommended treatment series cadence.
Professional and Scientific References
This article reflects professional protocol standards drawn from wound-healing science, clinical microneedling research, topical anaesthetic pharmacology, and published esthetic practice guidelines.
- Doddaballapur, S. (2009). Microneedling with dermaroller. Journal of Cutaneous and Aesthetic Surgery, 2(2), 110–111. Establishes foundational evidence for systematic pass technique in professional collagen induction therapy.
- Majid, I. (2009). Microneedling therapy in atrophic facial scars. Journal of Cutaneous and Aesthetic Surgery, 2(1), 26–30. Documents clinical protocol sequencing and depth considerations for zone-based treatment.
- Kalluri, H., & Bhowmick, S. (2020). Microneedle technology for transdermal drug delivery. Pharmaceutics, 12(12), 1162. Provides channel kinetics data relevant to the post-treatment delivery window and serum timing.
- Eichenfield, L. F., et al. (2002). A clinical study of the efficacy and safety of EMLA (eutectic mixture of local anaesthetics) in the dermatologic setting. Journal of the American Academy of Dermatology. Establishes occlusion time requirements for topical anaesthetic depth in esthetic procedures.
- Aust, M. C., et al. (2008). Percutaneous collagen induction therapy: an alternative treatment for scars, wrinkles, and skin laxity. Plastic and Reconstructive Surgery, 121(4), 1421–1429. Clinical evidence base for the wound-healing cascade triggered by controlled percutaneous injury and the importance of post-treatment skin management.
The post-treatment recovery phase is the step most commonly undervalued in microneedling protocol design, yet it has a direct and measurable impact on client recovery speed, outcome quality, and next-visit booking rates. For estheticians looking to standardise their recovery protocol around an evidence-appropriate product, the Poly-Luronic™ Jelly Mask meets the criteria that matter in a professional post-microneedling context: it is fragrance-free, formulated with polyglutamic acid and hyaluronic acid for dual-depth hydration support, and its alginate-based occlusive structure delivers actives against the compromised skin surface rather than allowing them to evaporate. The powder-format mixing system also means the esthetician controls dilution and timing precisely, rather than relying on a pre-mixed product with a fixed consistency. For esthetic practices where microneedling is a core service, having a standardised recovery mask that performs consistently across all client skin types reduces variability in outcomes and gives estheticians a professional framework they can communicate confidently during client consultations.
Explore the Poly-Luronic™ Jelly Mask LineFrequently Asked Questions: Microneedling Treatment Protocol
What are the steps of a professional microneedling treatment?
A professional microneedling treatment follows seven core steps: consultation and contraindication screening, skin cleansing and degreasing, topical numbing application and removal, serum application to the treatment area, systematic device passes using consistent pressure and overlapping strokes, immediate post-treatment calming and hydration, and a structured aftercare briefing for the client. Each step builds on the last, and skipping any phase increases the risk of uneven results, client discomfort, or post-inflammatory complications.
How long should I leave numbing cream on before microneedling?
Most topical anaesthetic formulations used in professional microneedling require 20 to 45 minutes of contact time under occlusion to achieve adequate dermal anaesthesia. The exact timing depends on the active agent and its concentration: lidocaine-based creams typically reach effective depth within 25 to 30 minutes, while combination formulas containing prilocaine may reach adequate numbness in 20 minutes. Estheticians should always follow the manufacturer’s instructions and confirm that the area is numb before beginning treatment passes, particularly over bony prominences such as the forehead and chin where client sensitivity is highest.
What needle depth should I use for a full-face microneedling treatment?
Needle depth for a full-face microneedling treatment varies by zone. Thinner skin areas such as the periorbital zone and upper lip typically require 0.25 mm to 0.5 mm, while the cheeks and forehead can tolerate 0.5 mm to 1.0 mm for most clients. Deeper depths of 1.0 mm to 1.5 mm may be used on the cheeks for scar revision in practices where estheticians are licensed to do so, but this range requires advanced training and is outside scope of practice in many states. Beginning with a conservative depth and adjusting based on client response is the standard professional approach.
How many passes should I do during a microneedling treatment?
Most professional microneedling protocols use two to four passes over each treatment zone, varying direction between vertical, horizontal, and diagonal strokes to ensure uniform channel distribution. A single pass rarely achieves sufficient collagen stimulation for visible results, while more than four passes in a single session significantly increases the risk of epidermal damage and prolonged recovery. The standard approach is two to three passes with consistent speed and pressure, re-applying serum between passes to maintain glide and ensure channels are infused at the moment of creation.
Does microneedling hurt, and how do estheticians manage client discomfort?
Microneedling with proper topical anaesthetic is described by most clients as a mild scratching or vibrating sensation rather than acute pain. Discomfort is most commonly reported at the forehead, chin, and around the nose where the skin sits close to bone. Estheticians manage this by ensuring full numbing has taken effect before beginning, working quickly and consistently through high-sensitivity zones, using adequate serum as a glide medium throughout the treatment, and applying a cooling calming mask immediately after the final pass to reduce immediate post-treatment heat and redness.
What serum should I apply during microneedling treatment passes?
During microneedling treatment passes, estheticians should apply serums containing hyaluronic acid, peptides, or growth factors that are formulated for transdermal delivery and free from alcohol, fragrances, and actives that could provoke irritation in open channels. Vitamin C in its ascorbic acid form is too acidic and should be avoided during passes. Retinoids are also contraindicated during active treatment. Hyaluronic acid serum is the most universally appropriate choice as it hydrates, provides glide, and has a well-established safety profile even in compromised skin.
Why does post-treatment recovery matter so much after microneedling?
Post-treatment recovery matters because microneedling temporarily disrupts the skin barrier by creating thousands of micro-channels, which simultaneously accelerates transepidermal water loss and leaves the skin in a state of acute vulnerability. Without immediate intervention to support hydration and barrier function, the inflammatory response can become excessive, recovery slows, and the risk of post-inflammatory hyperpigmentation increases. The first 20 to 30 minutes after the final treatment pass are the most critical window for delivering intensive hydration and calming actives directly to the compromised skin surface.
Can I do microneedling on a client who has active acne breakouts?
Active acne, particularly inflamed pustules and cysts, is a contraindication for microneedling in the affected zones. Passing a microneedling device over active lesions risks spreading bacteria into adjacent channels, worsening the breakout, and creating new inflammatory responses in previously clear areas. Estheticians should defer treatment until active lesions have fully resolved, or work around isolated problem areas while treating clear zones if the client has only minor localised breakouts and has been cleared through proper consultation. Non-inflamed comedones in otherwise healthy skin do not automatically contraindicate treatment.
How does the Poly-Luronic™ Jelly Mask fit into a professional microneedling protocol?
The Poly-Luronic™ Jelly Mask is applied immediately after the final microneedling pass as the post-treatment recovery step. At this stage, the skin has open micro-channels, elevated transepidermal water loss, and a disrupted barrier that cannot yet self-seal. The jelly mask format creates an occlusive film over the treated surface, trapping the polyglutamic acid and hyaluronic acid actives against the skin for the full 10 to 15 minute setting period rather than allowing them to evaporate. In clinical practice, estheticians working with the Poly-Luronic™ Jelly Mask after microneedling consistently report that clients describe a noticeably faster reduction in post-treatment heat and tightness compared with applying a standard hydration serum alone, which is consistent with the mask’s occlusive delivery mechanism.
A Consistent Protocol Is the Foundation of Professional Microneedling Practice
Microneedling is not a treatment where improvisation produces reliable outcomes. The seven-phase protocol described in this article exists because each step addresses a specific clinical variable—anaesthetic depth, surface preparation, channel distribution, serum delivery timing, and post-treatment barrier support—that directly influences both the safety and the efficacy of the treatment. Estheticians who execute this sequence consistently, treatment after treatment, build a clinical practice where results are predictable, client experiences are positive, and complications are rare.
The most common source of microneedling dissatisfaction in professional settings is not the device, the needle depth, or the products used—it is protocol shortcuts. Undertiming the numbing phase, skipping the second degrease, using a single depth setting across all facial zones, or delaying the post-treatment recovery step are all errors that are entirely within the esthetician’s control and entirely preventable. Committing to a disciplined protocol execution standard protects the client and protects the practice.
As you build and refine your microneedling service, returning to the protocol fundamentals outlined here will continue to serve you at every experience level—whether you are performing your first professional microneedling series or optimising a high-volume advanced treatment menu.