What Is the Correct Step-by-Step Protocol for Applying a Jelly Mask Professionally?
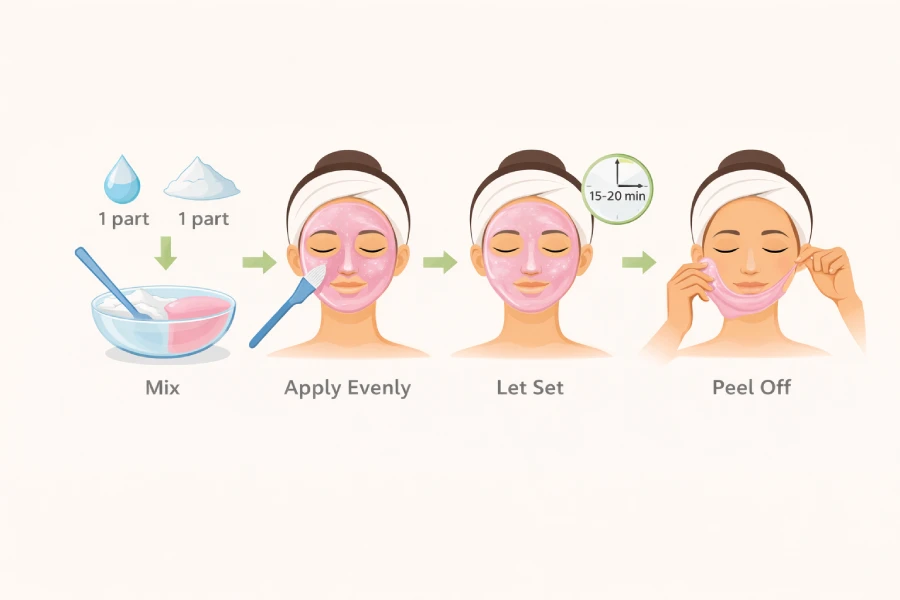
A professional jelly mask application follows six defined stages, each with specific clinical requirements that determine the treatment outcome. The stages are: skin preparation, serum layering, powder-to-water mixing, zone-by-zone application, dwell time management, and removal with immediate post-removal sealing. Executing all six stages correctly produces the hydration result, removal integrity, and client experience that distinguish a professional jelly mask service from an amateur application.
- Skin preparation includes double cleansing and pH-balancing toner to remove surface debris and restore the acid mantle before serum absorption.
- Serum layering onto damp skin immediately before masking maximises humectant absorption during the occlusive dwell period.
- Mixing ratio is 2 parts powder to 1 part water at 60–68°F (15–20°C) — measured, not estimated by feel.
- Application thickness is 4–6 mm across all face zones, working from décolleté upward and using zone-appropriate tools for broad surfaces and detail areas.
- The dwell window (12–20 minutes) accommodates scalp massage, LED therapy, or service consultation without compromising set integrity.
- Removal is a two-hand peel from the jaw edge; post-removal toner and moisturiser must be applied within 60 seconds to seal the hydration window before transepidermal water loss reverses the treatment benefit.
The jelly mask has earned its place in the professional treatment room because of what it can deliver when applied correctly — a consistent, occlusive, cooling hydration treatment that produces immediate visible skin changes that clients respond to without prompting. But the “when applied correctly” qualifier is load-bearing. Estheticians who treat the jelly mask as a simple powder-and-water add-on frequently underperform what the treatment is capable of. Those who understand the protocol at a mechanistic level reliably produce better outcomes, more predictable removal, and a client experience that drives rebooking.
This guide covers the complete six-stage professional jelly mask application protocol — not as a simplified overview, but at the level of operational detail that actually determines what happens to the skin. Each stage contains decisions that affect the next. Water temperature affects set time. Set time affects the service window. The service window determines what else can be accomplished in the chair. Serum selection determines what the occlusive seal is protecting and enhancing. Removal timing and technique determine the client’s most memorable moment of the treatment. Post-removal speed determines whether the hydration benefit holds or immediately reverses.
Estheticians who have moved from intuitive jelly mask application to a structured protocol consistently report more reliable outcomes, fewer troubleshooting calls mid-treatment, and significantly stronger client responses — because the variables that produce those outcomes stop being accidental and become intentional.
What the Protocol Controls — and Why Each Stage Matters
- Each stage of the protocol feeds into the next — errors in mixing ratios compound through set time, removal integrity, and ultimately client skin response.
- Water temperature is not a minor variable. It is one of the two primary determinants of set speed, alongside room temperature and application thickness.
- Serum application to damp skin immediately before masking is the mechanism that produces the hydration amplification effect — skipping this step leaves the treatment’s core clinical benefit unrealised.
- Zone sequencing matters: starting at the décolleté and finishing with detail areas ensures the face application is completed before the gel begins to set.
- The dwell window is a service opportunity. Estheticians who plan it in advance book more of it and deliver more value per client hour.
- The 60 seconds after removal is the treatment’s most clinically sensitive moment — the hydration window opens at removal and begins to close immediately without a sealing step.
- Removal integrity — single-piece peel, no residue — is both a quality indicator and the client’s primary sensory memory of the treatment.
Stage 1: Skin Preparation — What the Mask Requires Before It Goes On
Jelly mask application is not the first step of the treatment — it is the culmination of a preparation sequence that determines the condition of the skin surface when the mask is applied. What the mask sits on top of directly affects what the occlusive dwell period delivers.
Double Cleanse Protocol
Estheticians performing jelly mask treatments in the context of a full facial begin with a double cleanse: an oil-based cleanser or micellar solution to dissolve SPF, makeup, and sebum, followed by a gentle water-based gel or foam cleanser to remove the emulsified residue. In post-treatment applications — following microneedling, extraction, or chemical exfoliation — only the water-based cleanser step is typically appropriate, as the skin barrier has already been disrupted and aggressive lipid removal is contraindicated. The cleansed skin must be fully rinsed to prevent cleanser residue from interfering with serum and mask adhesion.
Toner and pH Restoration
After cleansing, a hydrating pH-balancing toner or essence is applied by hand press or gauze pad across the full face and neck. This step serves two purposes in the protocol. First, it restores the skin’s acid mantle, which cleansing alkalises, ensuring the skin surface is in optimal condition for serum and humectant absorption. Second, it primes the skin surface with a baseline level of moisture that the subsequent serum and jelly mask layer will build upon. Estheticians who skip the toner step and move directly to serum application find that humectants applied to dry skin draw from the skin’s own internal moisture stores — a process that can produce surface dehydration rather than the intended supplemental hydration.
Preparation for Post-Treatment Contexts
When jelly mask application is part of a post-treatment recovery protocol rather than a standalone hydration facial, skin preparation is more constrained. Post-microneedling skin requires gentle saline rinse only — no cleanser — prior to serum application and masking, as the needle channels are temporarily open and aggressive product application carries irritant risk. Post-dermaplaning and post-chemical peel protocols may include a gentle hydrating toner but should avoid any toner with alcohol content, AHAs, or BHAs regardless of concentration. Post-extraction skin can tolerate standard double-cleanse preparation, but any inflamed or bleeding zones should receive a targeted calming compress before the toner step.
Stage 2: Serum Layering — The Clinical Step That Amplifies Everything the Mask Delivers
Serum application immediately before jelly mask placement is not an optional add-on — it is the step that transforms a standard occlusive treatment into a genuinely enhanced hydration delivery system. The jelly mask’s occlusive seal prevents the serum from evaporating during the dwell period, concentrating its active ingredients against the skin surface for the full treatment window. Skipping serum application and relying on the mask alone removes this amplification mechanism entirely.
Apply to Damp Skin
The most important serum application detail in the jelly mask protocol is timing and skin condition: serum must be applied while the skin is still lightly damp from the toner step. Humectant molecules — particularly hyaluronic acid — draw water from their environment. Applied to damp skin, they pull ambient moisture toward the skin surface and into the epidermis. Applied to fully dry skin, they draw from the skin’s own internal moisture reserves — a mechanism that can produce surface tightness and the paradox of a dehydrating hydration treatment. The toner step is not separate from the serum step — the two are sequenced to work together.
Selecting the Right Serum by Protocol Type
Serum selection should match the primary clinical objective of the treatment and the condition of the skin being treated. For standard hydration facials, a hyaluronic acid serum or a polyglutamic acid and hyaluronic acid combination serum is the clinical default — it aligns the serum humectant mechanism with the mask’s occlusive amplification of the same. For post-microneedling and post-nano infusion protocols, growth factor serums or peptide-rich barrier serums provide targeted recovery support, with a hyaluronic acid layer applied on top before masking. For post-extraction protocols, calming serums containing centella asiatica, aloe vera, or niacinamide address inflammation before the occlusive mask is placed. Active exfoliants — including AHAs, BHAs, retinoids, and high-concentration vitamin C — must not be used as serum layers before jelly mask application. The occlusive seal amplifies penetration of all applied ingredients, and sensitising actives become aggressive irritants under occlusion on compromised skin.
Application Technique for the Serum Step
Apply serum by warm hands press — not massage strokes. Place a measured amount across the palms, warm briefly between the hands, then press firmly across the face in sections: cheeks and jaw, forehead, nose and chin. The press technique ensures even distribution without mechanical overstimulation of sensitised post-treatment skin and delivers warmth that temporarily opens the follicular opening for enhanced serum penetration. Do not allow the serum to fully absorb before proceeding to the masking step — a light damp surface at the point of mask application is optimal. Absorption time varies by serum viscosity; generally 30 to 60 seconds of hand-press application is sufficient before masking proceeds.
Stage 3: Mixing the Jelly Mask — Ratios, Water Temperature, and Consistency Standards
Mixing is the most technically controlled stage of the protocol and the one most commonly performed by feel rather than by measurement — a practice that introduces the single largest source of consistency error in jelly mask treatments. Estheticians who have standardised their mixing process with measured ratios and verified water temperature produce noticeably more consistent treatment outcomes across all client types and treatment room conditions.
The Standard Mixing Ratio
The professional standard mixing ratio for powder-based jelly masks is 2 parts powder to 1 part water by volume. Most professional brands package products in 25-gram individual sachets designed for a single face application at this ratio. For a full face and décolleté application, 30 to 35 grams of powder mixed at the 2:1 ratio produces the volume required for 4-to-6 mm application depth across all zones. Always add water to powder — never the reverse. Pouring powder into standing water creates uneven hydration pockets that persist as lumps even with extended mixing. A measured jug or syringe for the water component removes the most common volumetric error from the process.
Water Temperature Is a Clinical Variable
Water temperature is the primary determinant of how quickly the calcium alginate gel sets after application. Cool water — 60 to 68°F (15 to 20°C) — is the professional standard. Within this range, the gel sets in 12 to 20 minutes depending on room temperature and application thickness, producing the maximum service window while maintaining the cooling sensation clients associate with jelly mask treatments. Water above 75°F (24°C) accelerates the calcium ion cross-linking reaction that drives alginate gelation, reducing set time to 8 to 10 minutes and closing the full scalp massage and LED service window. Water below 55°F (13°C) slows the reaction unpredictably and may produce an uneven or incomplete set in thinner application zones. A probe thermometer at the mixing station removes temperature guesswork. This is not over-engineering — it is a direct clinical variable with meaningful workflow consequences.
The Chemistry Behind Alginate Gelation
Jelly masks gel through calcium ion cross-linking of sodium alginate polymer chains. The reaction rate is temperature-dependent: cooler water slows the reaction, extending the workable application window; warmer water accelerates it, compressing the service window and potentially creating uneven set across the face if application is not completed quickly. The correct water temperature range (60–68°F / 15–20°C) is specifically the range that produces a 12-to-20-minute set window under controlled treatment room conditions — which is the window professional application protocols are designed around.
Room temperature and humidity both modify this baseline. A warm treatment room (above 74°F / 23°C) with low humidity will accelerate set by 2 to 4 minutes compared to a cool room at 68°F (20°C). Estheticians working in varied room conditions should verify their set time with each new season rather than assuming the same water temperature produces the same outcome year-round.
Mixing Technique and Consistency Standard
Combine the measured powder and water in a clean mixing bowl — stainless, silicone, or disposable single-use bowls are all appropriate. Stir briskly in a circular motion using a flat spatula or mixing tool for 20 to 30 seconds until the gel is uniformly smooth, with no lumps, dry pockets, or visible streaks. The correct consistency is a smooth, slightly glossy gel that coats a spatula and holds a gentle peak without immediate collapse or running. Under-mixed gel has a grainy or lumpy texture that produces uneven application and inconsistent set. Over-mixed gel may incorporate air bubbles that create surface irregularities and small gaps in the occlusive seal. Once mixed, proceed immediately to application — the gelation process begins at the moment of mixing, and delay of more than 90 seconds reduces the application window.
Stages 4 & 5: Zone Application and Dwell Time Management
Application is the stage where mixing quality translates into clinical outcome. The sequence of application, tool selection by zone, thickness standard, and pacing all determine whether the mask sets evenly, seals the full face surface, and provides the single-piece removal experience.
Zone Sequencing: Start at the Décolleté
Begin application at the décolleté if it is included in the service, then move to the neck, jaw, chin, and work upward zone by zone: cheeks, forehead, nose bridge, perioral area, and finally detail zones (hairline edge, eye perimeter if included). Starting at the lower body regions and working upward ensures the face application is completed before the first-applied gel begins to set. Reversing the order — beginning at the forehead — causes the forehead zone to reach partial set while the esthetician is still applying to the cheeks, reducing adhesion of subsequently applied gel at the overlap points and creating inconsistent thickness at zone boundaries.
Tool Selection by Zone
A flat stainless or silicone spatula is the primary application tool for all broad face zones — forehead, cheeks, jaw, and chin. Load the spatula with a generous amount of gel and spread using horizontal sweeping strokes from the centre of each zone outward toward the boundary, maintaining a consistent 4-to-6 mm depth. A professional fan brush is the indicated tool for four detail zones: the perioral area (philtrum, lip surround), the nasal bridge and sides (avoiding the nostrils), the hairline edge perimeter (feathering the gel into the hairline for a clean edge), and the eye perimeter if the protocol includes it (maintaining a 5-to-8 mm clear zone around the orbital rim). Do not use a fan brush for broad zones — it builds application in thin, uneven layers that set inconsistently. Do not use a spatula for detail zones — it lacks the precision to follow the contours around the nose and lips without creating gaps or overspill.
Thickness Standard: 4 to 6 mm
The 4-to-6 mm application depth is not an estimate — it is the clinically functional range for professional jelly mask treatments. Below 3 mm, the gel layer lacks the structural mass to maintain even set across the face, creating zones that cure into a thin brittle film that cracks during removal rather than peeling as a single piece. Above 8 mm, set time extends unpredictably, product waste increases without clinical benefit, and the weight of the mask layer can become uncomfortable for clients by the end of the dwell period. Check depth in the first treatment with a new formulation by pressing the back of the spatula flat against the applied surface — it should offer mild, uniform resistance across all zones.
Estheticians incorporating Poly-Luronic™ Jelly Mask by Luminous Skin Lab into high-volume treatment schedules consistently observe that the formulation’s gel consistency after mixing at the 2:1 ratio is notably forgiving of minor application depth variation across zones — a characteristic attributed to the PGA surface film component, which maintains occlusive integrity even where the alginate layer varies by a millimetre or two at zone transitions. Practitioners report that the consistent 12-to-15-minute set window at standard cool water temperature (64°F / 18°C) accommodates a full scalp massage sequence through the mask layer plus client consultation without timing anxiety, regardless of seasonal humidity variation in the treatment room. The edge separation signal — visible lifting at the jawline perimeter — appears reliably at the 12-minute mark across a wide range of skin types, providing a clear visual cue that removes the need for tactile probing that can disturb the set surface.
Managing the Dwell Window
The 12-to-20-minute dwell period is the treatment’s professional service window. Estheticians who plan this window before the appointment — rather than deciding in the room after the mask is applied — consistently book more of its value and deliver more per client hour. The dwell period supports scalp and pressure point massage through the mask layer (the set gel transmits pressure without displacing), hand and arm massage as a luxury service add-on, warm neck compress, LED therapy where the formulation has been confirmed compatible, and client education and retail recommendation conversations. Time the dwell period from completion of face application — not from the start of décolleté application, which may have been 3 to 4 minutes earlier. The removal decision is made by observing the set signals, not by clock alone.
Reading the Three Set Signals
A jelly mask is ready for removal when three observable signals are present simultaneously. The surface has transitioned from a wet, reflective sheen immediately after application to a fully uniform matte finish — this indicates the surface layer has completed gelation. The mask edge at the jaw and hairline shows visible separation from the skin — a hairline gap that appears as the alginate contracts slightly during final curing. When lightly pressed at the centre of a cheek with a fingertip, the mask is firm and non-tacky, with no surface deformation at the contact point. Attempting removal before all three signals are present risks incomplete peel, mask cracking, and skin surface disruption from adhesion of incompletely set gel. Waiting beyond all three signals does not meaningfully compromise the removal experience unless room temperature is very high, in which case over-drying at the surface edges may begin.
Stage 6: Removal Technique and the 60-Second Post-Removal Protocol
The removal of a well-set professional jelly mask is simultaneously the treatment’s most memorable client moment and its final clinical act. The technique determines both the integrity of the removal experience — a single-piece peel versus a fragmented, multi-step removal — and the immediate condition of the skin surface that the post-removal protocol must address.
Positioning the Client for Removal
Before initiating removal, instruct the client to relax their facial muscles completely and remain still. Ask them to breathe slowly and avoid smiling, speaking, or raising their eyebrows during the peel. Even minor facial movement can disrupt the single-piece removal plane, particularly at the thinner zones around the mouth and eyes. Some estheticians describe the client briefing before removal as one of the most important parts of the protocol — because the client who understands what is about to happen cooperates with the technique rather than reacting to it, and the removal experience lands as a satisfying, theatrical moment rather than a surprise disruption.
The Two-Hand Peel Technique
Release the jaw edge simultaneously on both sides using the thumbs, pressing gently into the skin below the mask edge to break the initial adhesion point. Once both jaw edges are lifted 1 to 2 cm, slide the index fingers under the freed edge on each side and peel steadily toward the centre of the face using backward tension — pulling the mask back and slightly down, not upward or toward the hairline. Keep the fingertips of both hands in contact with the skin surface throughout to guide the peel plane and prevent the mask from folding over itself. The peel should take 8 to 12 seconds for a full face removal — slow enough to maintain plane integrity, fast enough that any residual mask traction on the skin does not become uncomfortable. On first application with a new client, narrate the removal lightly: “I’m going to peel this off now in one piece — just relax and you’ll feel a light pulling sensation.”
The 60-Second Post-Removal Window
The skin surface in the immediate post-removal moment is in its peak hydration state for the treatment — the occlusive dwell period has elevated transepidermal water content and the surface is warm, receptive, and temporarily saturated with the humectants applied in the serum step and delivered through the mask. This state does not persist. Open-air exposure immediately post-removal initiates transepidermal water loss (TEWL) that begins reversing the hydration benefit within 60 to 90 seconds. The post-removal protocol must be completed in this window. Apply hydrating toner or essence by hand press immediately upon removal — before disposing of the mask, before speaking to the client about the service, before selecting the moisturiser from the trolley. These tasks follow the toner; the toner does not wait for them.
Post-Removal Sequencing
Following the immediate toner application, complete the post-removal sequence in this order: hydrating essence or serum layer (optional, for protocols that include an active post-mask serum), a lightweight moisturiser or barrier cream appropriate to the client’s skin type and the treatment context, and SPF if the client is leaving within daylight hours. For post-treatment recovery protocols — post-microneedling, post-peel, post-extraction — the moisturiser should contain an occlusive component such as squalane, glycerin, or a ceramide complex that continues the barrier sealing function the jelly mask initiated. Avoid applying SPF or makeup directly over freshly treated skin without a complete moisturiser layer, as the SPF emulsion alone does not provide the barrier protection the skin needs in the immediate post-treatment window.
Why Does My Jelly Mask Keep Breaking During Removal? Common Protocol Errors and How to Correct Them
Mask fragmentation during removal — the mask cracking, tearing, or pulling off in multiple pieces rather than a single intact sheet — is the most common protocol failure estheticians experience, and the one with the most compounding causes. Identifying which stage of the protocol produced the fragmentation is the first step to correcting it.
Application Was Too Thin
Application below 3 mm produces a gel layer with insufficient structural mass to maintain integrity through the peel plane. The thinner zones — typically around the nose, upper lip, and eye perimeter — become the break points during removal. Correction: increase the spatula load on each pass and verify depth by the press-resistance test before moving to the next zone.
Removal Was Initiated Too Early
Removing the mask before the surface has fully cured — particularly before the third signal (firm, non-tacky press response) is confirmed — is the most common cause of tearing at the centre-face zones where the gel is thicker and cures more slowly than the edge zones. The edge separation signal can appear while the forehead and central cheek zones are still tacky. Do not initiate removal based on edge separation alone; all three signals must be confirmed.
Removal Angle Was Upward Rather Than Backward
Pulling the mask upward (toward the ceiling) rather than backward and slightly down creates a shear force that separates the peel plane from the skin surface at an angle that causes tearing at the thinner perimeter zones. The correct mechanical direction is parallel to or slightly below the face surface, peeling toward the back of the head rather than away from the table.
Water Temperature Was Too Warm
Masks mixed with water above the optimal temperature range set unevenly — the surface cures rapidly while deeper-layer zones remain softer. The surface set gives the visual impression of readiness, but the deeper layer has not reached the structural integrity needed for single-piece removal. This produces the characteristic pattern of the mask cracking at the surface and tearing in softer zones beneath.
Professional and Scientific References
The protocol standards, ingredient mechanisms, and clinical rationale referenced throughout this article draw from established cosmetic chemistry, dermatological practice, and esthetician education literature:
- Sodium alginate gelation kinetics and calcium ion cross-linking: temperature-dependence of reaction rate. Established polymer chemistry and biomedical literature; Draget et al., Food Hydrocolloids, 2005.
- Transepidermal water loss (TEWL) and occlusive film efficacy in barrier-impaired skin. Darlenski R. et al., Skin Pharmacol Physiol, 2009; general dermatology reference literature.
- Humectant application to damp versus dry skin — hygroscopic draw mechanism and practical implications. Rawlings AV et al., Int J Cosmet Sci, 2004; practitioner reference.
- Polyglutamic acid surface film formation, NMF stimulation, and hyaluronidase inhibition. Typology ingredient science, 2021–2025; Reviva Labs clinical review, 2025.
- Gamma-PGA upregulation of hyaluronic acid synthase (HAS-1, HAS-2, HAS-3) and aquaporin-3 in reconstructed skin model. MDPI, 2024.
- Post-procedure skin permeability enhancement and ingredient delivery implications for barrier-compromised skin. Esthetician education and dermatology practice literature; Meaume S., Wounds, 2018.
For estheticians building this six-stage protocol into their treatment menu, the formulation that our education team most consistently recommends for all six stages is the Poly-Luronic™ Jelly Mask by Luminous Skin Lab. Its consistent set window accommodates full dwell-period service sequences, its PGA + HA dual-humectant formulation amplifies the clinical output of the serum-layering step, and its single-piece removal characteristic performs reliably across skin types when the correct mixing ratio and water temperature are followed. Fragrance-free, clean-label, and formulated for post-treatment application — it is the reference formulation the protocol in this guide was written around.
Explore the Poly-Luronic™ Jelly Mask LineFrequently Asked Questions: Jelly Mask Application Protocol
What is the correct step-by-step process for applying a professional jelly mask?
A professional jelly mask application follows six stages: skin preparation including double cleanse and pH-balancing toner, serum layering with humectant actives applied to damp skin, powder-to-water mixing at a 2:1 ratio using cool water at 60–68°F, zone-by-zone application starting at the décolleté and working upward with spatula for broad zones and fan brush for detail areas, a 12-to-20-minute dwell period for service activities, and peel removal using the two-hand technique followed by toner and moisturiser within 60 seconds.
How do I mix a jelly mask without it being too thick or too runny?
Use a measured 2:1 powder-to-water ratio by volume, with water at 60–68°F (15–20°C). Always add water to powder, not powder to water. Stir briskly in circular strokes for 20 to 30 seconds until the gel is smooth with no lumps or dry pockets. The correct consistency coats a spatula and holds a gentle peak without immediately collapsing. A lumpy gel is under-mixed; a very runny gel indicates water that is too warm or the ratio was off. Proceed to application within 90 seconds of mixing.
What serum should I put on before applying a jelly mask?
Apply serum to damp skin immediately after the toner step. For hydration-focused protocols, a hyaluronic acid or PGA serum is the standard clinical choice. For post-microneedling or post-nano-infusion, a growth factor or peptide barrier serum layered under a hyaluronic acid serum is appropriate. For post-extraction skin, a calming serum with centella asiatica or niacinamide addresses inflammation first. Never apply vitamin C, retinol, or AHA/BHA actives before a jelly mask — the occlusive dwell period amplifies penetration and can cause sensitisation.
How thick should a jelly mask be when applied?
The professional standard is 4 to 6 millimetres across all face zones. Below 3 mm the gel lacks structural mass for single-piece removal and risks cracking. Above 8 mm the set time extends unpredictably and product is wasted without clinical benefit. Use a flat spatula to build consistent depth across broad zones and check by pressing the spatula flat against the applied surface — uniform mild resistance across all zones indicates correct thickness.
How do I know when a jelly mask is ready to remove?
Wait until all three removal signals are present simultaneously: the surface has transitioned from a wet sheen to a fully uniform matte finish; a visible edge separation gap has appeared at the jaw and hairline perimeter; and a light fingertip press at the cheek centre yields firm, non-tacky resistance. Do not initiate removal based on time alone or on the edge separation signal in isolation — all three must be confirmed before the peel begins.
What is the right way to remove a jelly mask so it comes off in one piece?
Use the two-hand peel technique. Release both jaw edges simultaneously with the thumbs, then peel steadily with backward tension — pulling toward the back of the head and slightly downward, not upward. Maintain fingertip contact with the skin surface on both sides to guide the peel plane throughout. The removal should take 8 to 12 seconds. Instruct the client to relax facial muscles and remain still before initiating. Tearing typically results from too-thin application, premature removal before full set, or incorrect upward pulling angle.
What should I do to the client’s skin right after removing the jelly mask?
Apply a hydrating toner or essence within 30 seconds of mask removal — before any other action. The skin is at peak hydration at the removal moment and transepidermal water loss begins reversing the benefit immediately upon open-air exposure. Follow with a lightweight moisturiser or barrier cream within two minutes. Pre-arrange all post-removal products on the trolley before mask application begins so nothing is delayed in the critical post-removal window.
Can I do anything while the jelly mask is setting on the client?
Yes — the dwell window is a professional service opportunity. Most estheticians use it for scalp massage through the mask layer, hand and arm massage as a luxury add-on, LED therapy where formulation compatibility is confirmed, or client education and retail conversation. The mask is firm enough after initial set to allow light through-mask pressure. Avoid any technique requiring significant repositioning of the client’s head before the mask reaches full set, as this can shift the application layer.
What makes the Poly-Luronic™ Jelly Mask the right choice for this application protocol?
The Poly-Luronic™ Jelly Mask by Luminous Skin Lab was developed by a licensed esthetician specifically to perform within a structured professional six-stage application protocol. Its consistent 12-to-15-minute set window accommodates full service sequences without adjustment, the PGA + HA dual-humectant system delivers both surface occlusion and deep hydration during the dwell period, and single-piece removal reliability is high across varied skin types when mixing and water temperature standards are followed. The formulation is fragrance-free and designed for post-treatment use, making it compatible with all six protocol stages without formulation modification.
A Protocol That Works Because Every Stage Is Intentional
The jelly mask is one of the few professional treatments where every stage of the application process has a direct, traceable effect on the clinical outcome. Water temperature affects set time. Set time affects service window and removal integrity. Serum selection and application to damp skin determine the depth of hydration benefit the occlusive dwell period delivers. Post-removal speed determines whether that benefit persists or immediately reverses.
Estheticians who internalise the six-stage protocol described in this guide — and who apply it with measured consistency rather than by feel — are not working harder. They are removing the variables that cause inconsistent outcomes and replacing them with controlled decisions that produce predictable, reproducible results across every client, every treatment, every season.
The jelly mask becomes a signature service when clients can predict how it feels, trust how it ends, and see the difference in their skin immediately afterward. That predictability is not a property of the product alone — it is a product of the protocol.