How Do You Apply a Jelly Mask Without Making a Mess?
Clean jelly mask application is almost entirely determined before the gel touches the client’s skin. The workstation setup, the mixing ratio, the placement of the bowl, and the draping of the client account for the vast majority of mess incidents. When these are correct, the spatula technique and application sequence complete the picture.
- Correct mixing ratio is the single most impactful variable — a firm, cohesive gel holds its shape on the spatula and stays where it is placed. An over-watered mix runs off the spatula, pools at the jawline, and drips toward the neck before setting begins.
- Place the mixing bowl on the tray directly beside the client’s head — never require a loaded spatula to travel more than a few inches before reaching the skin.
- Drape the client with a towel across the chest and a second towel or headband at the hairline before mixing begins. These two barriers contain virtually all incidental drips.
- Use a flat, forward-pressing spatula stroke rather than a lifting or scooping motion. Lifting the spatula tip flings gel off the edge.
- Apply in sequence: chin and jaw first, cheeks, then forehead, nose last. Starting at the lower face establishes clean borders before the gel begins its initial set.
- Remove gel from the hairline immediately after application if any contact occurs — before it sets, when removal is easy and does not pull hair.
- Post-service cleanup is fastest when draping is correct — the peel-off film removes the majority of gel in one piece, and contained drips are removed with the draping.
Of all the reasons estheticians hesitate to incorporate professional jelly masks into their service menu, or limit how often they offer them, concern about mess is among the most consistent. The combination of a powder that gets airborne during measuring, a gel that can run before it sets, and a removal process that involves peeling a film off a client’s face creates a mental image of a chaotic service — one that takes longer to clean up than to execute.
That image is inaccurate when the service is correctly set up. Estheticians who have refined their jelly mask workflow consistently describe the service as one of the cleanest in their treatment room — a contained, controlled application, a set period during which nothing needs to happen, and a peel-off removal that takes the majority of the gel with it in one piece. The difference between a messy jelly mask service and a clean one is almost entirely in the setup and preparation decisions made before the bowl is mixed.
This guide covers every element of a clean jelly mask service from the initial workstation setup through post-service cleanup: what to prepare, how to drape, how to mix and position the bowl, how to apply with controlled spatula technique, how to manage the edges and hairline, and how to clean up efficiently afterward. The goal is a service that is as easy to execute cleanly as it is clinically effective.
What Controls Mess in a Professional Jelly Mask Service
- Mess in jelly mask services is almost always caused by setup and mixing variables — not inherent product properties. The same formulation can be applied cleanly or messily depending entirely on preparation.
- Correct ratio first. A firm gel does not run. An over-watered gel runs everywhere. Measure every time.
- Bowl placement is underrated. Placing the bowl beside the client’s head eliminates the most common drip point: a loaded spatula carried across the room.
- Draping is mess containment infrastructure. Two towels — one at the chest, one at the hairline — absorb virtually all incidental gel contact outside the treatment zone.
- Flat spatula stroke, not lifting stroke. Every lifted spatula tip is a potential gel fling toward equipment or clothing.
- Application sequence matters. Jaw first, forehead last. Clean borders are easier to establish in the lower face before the gel begins to stiffen.
- Post-service cleanup is fast when draping is correct. The peel-off film does most of the work.
How Should You Set Up Your Workstation Before Mixing to Keep the Service Clean?
A clean jelly mask service begins with workstation setup, not with the mixing bowl. Every esthetician who has refined this service to a clean, repeatable standard will describe the same pre-mixing checklist — not because they are especially meticulous, but because skipping any one of these steps reliably produces a mess point that could have been eliminated in thirty seconds of preparation.
Protect the Treatment Bed
The treatment bed should have a disposable or washable barrier under the client’s head and neck before the client is positioned. Gel that migrates from the back of the jaw and neck during the set period, and the occasional gel contact at removal, stays on this barrier rather than on the sheet. A disposable paper table cover or a dedicated washable pillow cover serves this function. Changing sheets between clients takes longer than replacing a disposable barrier or laundering a dedicated cover.
Pre-Position the Draping Towels
Two towels should be pre-staged before the client is draped. The first — a clean facial towel folded lengthwise — goes across the client’s chest and décolleté immediately after they lie down. The second — either a thin folded towel, a disposable facial strip, or a soft headband — goes at the hairline before the mask is applied. These two barriers contain the two most common drip destinations: the chest (from gel that runs at the jaw angle) and the hairline (from gel that spreads at the temple and forehead during application).
Position the Tray Beside the Client’s Head
The mixing bowl and spatula should be placed on a tray or trolley positioned directly beside the client’s head at treatment level — not across the room, not on a counter behind the esthetician. Every inch a loaded spatula travels from bowl to skin is a potential drip point. Estheticians who mix at a distant station and then carry loaded spatulas to the treatment bed are creating the most common single mess point in the service. Bowl beside the head: gel stays on the spatula until it reaches the skin.
Lay Out Tools Before Mixing
The mask spatula, damp cotton pads for any immediate corrections, and any gauze pads (if periorbital coverage is planned) should all be within arm’s reach before the powder contacts the water. Once the mixing begins, the gel starts its gelation timer. An esthetician who needs to locate a tool after mixing begins either rushes the application or lets the gel begin to set in the bowl — both create mess risks that are entirely avoidable with pre-staged tools.
The Three Setup Decisions That Prevent the Majority of Mess
Bed barrier + draping: A disposable or washable bed barrier under the client’s head and neck, a chest drape towel, and a hairline towel or headband contain virtually all incidental gel contact outside the face. Skipping any of these adds cleanup time at the end of the service and risks staining linens that take significantly longer to launder than to protect in the first place.
Bowl beside the head: A loaded spatula that travels more than 6 to 8 inches from the bowl to the skin is a drip waiting to happen. A tray positioned at treatment-table level beside the client’s head eliminates this travel distance. The spatula goes directly from the bowl to the face with no intermediate distance for gel to run off the blade.
Measured ratio: Firm gel holds its form on the spatula. Runny gel does not. The ratio is the physics of the gel’s viscosity. A correctly mixed gel can be loaded onto a spatula, carried 6 inches, and spread in a controlled stroke without losing material to drips. An over-watered gel runs off the spatula tip before the stroke is complete. Measure every time.
What Is the Correct Application Sequence for a Clean, Controlled Jelly Mask Service?
The sequence in which the mask is applied across the face directly affects how well borders are controlled, where incidental overflow ends up, and how much adjustment is needed at the edges before the gel begins to set. Estheticians who apply in a consistent sequence report fewer border issues and less post-application edge correction than those who start wherever is most accessible and work outward inconsistently.
Chin and Jawline First
Starting at the chin and working along the jawline to both sides establishes the lowest border of the application zone. Any overflow at this stage drips downward onto the chest draping towel rather than onto skin. The jawline border established here is the edge that is most likely to be sharp and clean by the time the gel begins its initial set.
Cheeks and Mid-Face
Move from the jaw upward across both cheeks, working in smooth horizontal strokes from the centre of the face outward. The cheek zone is the largest surface area and benefits from a slightly thicker application. Keep the lateral edges 1 cm inside the hairline at the temples — do not spread to the very edge of the face at this stage.
Forehead
Apply the forehead zone in horizontal strokes from the centre outward, finishing 1 cm inside the hairline. The gel along the temple and forehead hairline border is the most vulnerable to hairline contact. Apply last so the gel in the bowl is at its firmest consistency when the hairline border is being managed — slightly firmer gel produces a more controllable edge.
Nose and Perioral Zone
Apply the nose bridge and sides last, followed by the perioral contour if lip coverage is included. These smaller zones benefit from the esthetician’s established application rhythm and require more precise spatula control due to the contoured anatomy. Use a smaller spatula load and shorter strokes for the nose bridge and lip contour.
Immediate Edge Check
As soon as the full face is covered, make one pass around the perimeter — jawline, temples, hairline, chin — to catch any overflow before it migrates further. A damp cotton pad removes fresh gel from the hairline in seconds. Gel that has reached the hairline and begun to set takes significantly more effort to remove and carries a risk of pulling fine hairline hair.
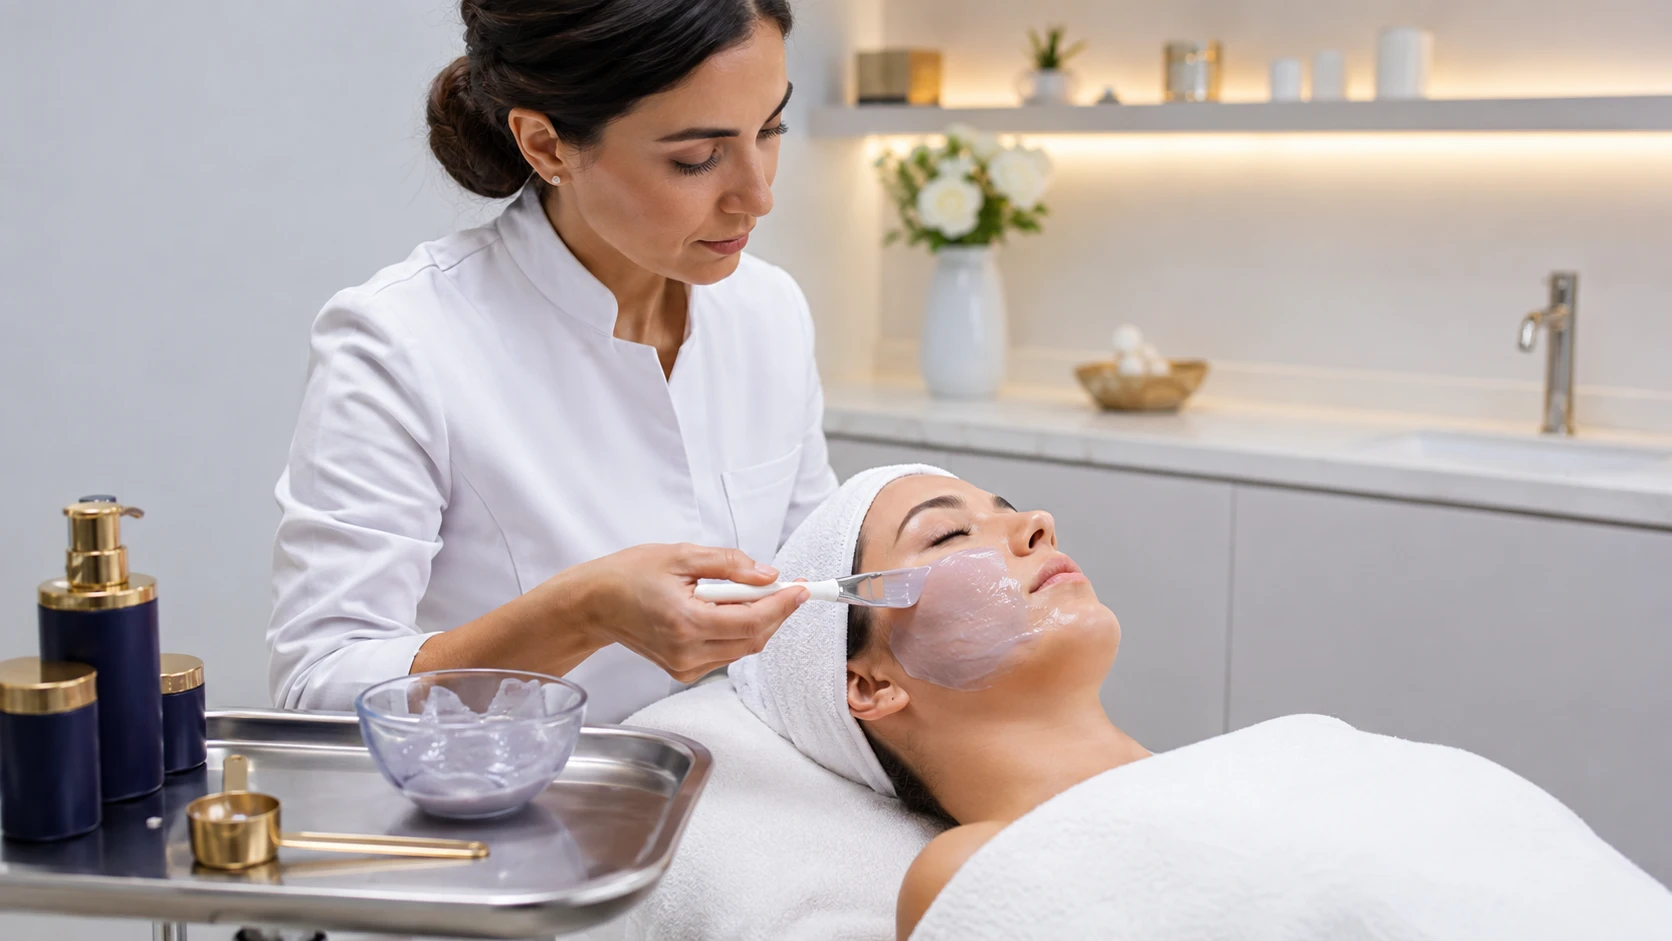
What Spatula Technique Keeps Gel on the Face and Off the Treatment Room?
Spatula technique is the most immediately correctable variable in jelly mask application. Estheticians who develop the correct stroke early eliminate one of the most common individual causes of gel landing where it should not — on towels, treatment equipment, or the esthetician’s own clothing.
The Flat Pressing Stroke
The correct spatula motion is a flat, forward-pressing stroke with the face of the spatula held nearly parallel to the skin surface — approximately 10 to 15 degrees from flat. The gel is spread by pressing it forward and down, not by dragging an upright spatula across the skin. This technique keeps the gel in full contact with the spatula face throughout the stroke and deposits it onto the skin in a controlled, even layer.
The motion to avoid is the lifting stroke — where the spatula tip rises at the end of each pass and flicks the leading edge of the gel off the blade. This is the primary cause of gel landing on treatment equipment, towels, and the esthetician’s uniform. Estheticians who are accustomed to applying other types of masks may need to consciously retrain this motion: keep the tip down, finish each stroke by pressing forward and releasing, rather than lifting and flicking.
Loading the Spatula Correctly
Over-loading the spatula is the second most common technique error contributing to mess. A spatula loaded with enough gel to cover two to three square inches of skin is the appropriate amount per stroke. A spatula loaded with enough gel to cover half the face is a spatula loaded with enough gel to fling half a face’s worth of gel off the edge during transfer. Load moderately, apply, reload. The additional bowl-to-face trips are negligible in time and entirely worth the improved control.
Handling the Edges
The edge zones — jaw angle, temples, hairline, and chin point — are best handled with the spatula held at a slightly higher angle and a shorter stroke, depositing the gel at the border rather than spreading it across and past. Think of each edge application as placing the gel down rather than spreading it outward. Place the load at the edge, then smooth inward — never spread outward beyond the intended border.
How Do You Manage the Hairline and Edge Zones Without Getting Gel in the Hair?
The hairline is the single most discussed mess point in jelly mask application, and the one that generates the strongest client reaction when it goes wrong. Gel that gets into the hair before it sets is significantly more difficult to remove than gel on skin, and the process of removing it — wetting and working the hair at the hairline — is disruptive to the service in a way that a small drip on the chest draping towel is not.
The Hairline Barrier is Non-Negotiable
A folded damp towel tucked snugly against the hairline, or a soft headband placed firmly before application begins, is the primary physical defence against gel-in-hair. The key word is snugly — a loosely placed towel or a headband that sits half an inch from the hairline allows gel to migrate into the gap during the set period. The barrier should sit in contact with the hairline skin so that gel spreading toward the hair contacts the barrier first.
Apply the Forehead Zone Last and Stop 1 cm Inside the Hairline
The technique discipline for the hairline border is to terminate the gel application one centimetre inside the hairline across the entire forehead and temple zone. This creates a visible unpainted margin between the leading edge of the gel and the first hairline hairs. The gel spreads very slightly as it is pressed, and during the early set period it may spread a further millimetre or two. The 1 cm setback absorbs this natural spread and keeps the final gel edge well clear of the hair follicles.
Immediate Correction Protocol
If gel does reach the hairline during application — at a temple or corner of the forehead where the curve of the face makes spatula control slightly harder — the correction must happen immediately, before the gel begins to set at that location. A damp cotton pad pressed gently against the hairline contact area and removed cleanly takes the fresh gel with it without disturbing the rest of the application. Gel that has been allowed to begin setting at the hairline requires more aggressive removal and is more likely to contact and pull fine hairline hairs during cleanup.
Neck and Jaw Angle
The jaw angle — the zone where the jawline meets the ear and transitions into the neck — is the second most common edge mess point. Gel applied at the lower cheek and jaw can migrate toward this area during the set period if the jawline border is not clearly established. Applying the jawline border first in the application sequence (as described in the five-step order above) and reinforcing it with a clean, deliberate stroke that terminates at the jaw rather than rounding onto the neck contains this effectively. A small drip at the jaw angle that reaches the chest draping towel is inconsequential — a drip that reaches the neck or ear without a draping towel in place is not.
Estheticians who have refined their jelly mask workflow using Poly-Luronic™ Jelly Masks by Luminous Skin Lab across high-volume treatment schedules consistently identify two technique habits as the difference between a service that requires five minutes of cleanup and one that requires thirty seconds. The first is the bowl-beside-the-head habit — placing the tray at treatment level before mixing rather than carrying loaded spatulas from a distant station. The second is applying the forehead and temple zones last, when the remaining gel in the bowl has slightly firmed from the gelation reaction and is at its most controllable consistency for the precision work at the hairline.
The Poly-Luronic™ formula’s approximately 12-to-15-minute set window provides enough working time to apply the full face at a controlled pace without rushing, which means the gel in the bowl is still workable when the forehead zone is reached but just firm enough to hold a clean edge at the temple hairline. Estheticians transitioning from faster-setting formulations note that having adequate working time is itself a significant clean-application advantage — rush the application and edge control is the first thing lost.
What Is the Fastest and Most Complete Post-Service Cleanup Protocol?
Post-service cleanup for a well-drape jelly mask service is faster than most estheticians expect before they have refined their setup. The peel-off film does the heavy lifting, the draping towels contain what the film does not, and implements clean easily once set gel has been allowed to fully cure.
Skin Cleanup After Peel-Off
After the mask is removed as a single peel-off film, residual gel on the skin surface — typically a light film at the application edges and occasionally at the jawline or temples — is removed with a warm, damp facial towel or damp cotton pads. A single pass with a warm damp towel across the full face in the direction of the peel typically removes all visible residue. A small amount of remaining film at the hairline edge or jaw angle is addressed with a targeted cotton pad wipe rather than rewashing the full face.
Draping Disposal and Linen Management
The chest draping towel and hairline towel are removed immediately after the mask is peeled off. Any incidental gel that reached these barriers is contained within them. Disposable draping strips go directly into the bin. Reusable towels go into the laundry. The key practice is removing them before the service wind-down activities — not leaving them in place while applying post-mask products, where they continue to contact the client and potentially transfer gel residue.
Implement Cleanup: Bowl and Spatula
Set gel on the mixing bowl, spatula, and tray peels cleanly from non-porous surfaces once it has fully cured. Estheticians who allow the residual gel in the bowl to finish setting while conducting the post-mask skin treatment steps find that by the time the client leaves, the bowl residue peels out as a single piece with no scrubbing. For any gel that has not fully set by cleanup time, two minutes of soaking the bowl and spatula in warm water dissolves the alginate network sufficiently for easy rinsing. Gel does not need aggressive cleaning products — warm water is sufficient for all implements.
What Common Habits Make Jelly Mask Application Messier Than It Needs to Be?
Beyond the positive practices described above, several habits that estheticians carry from other mask application experience actively increase mess when applied to jelly masks. Recognising these habits allows estheticians to consciously override them.
Mixing at a Distant Station and Carrying the Bowl
Some estheticians are accustomed to mixing products at a fixed station and then moving to the treatment bed. With a jelly mask, this workflow means carrying a bowl of gel — and loading spatulas from a bowl that may be resting on a counter behind the client rather than beside their head. Every loaded spatula that travels more than a few inches is a drip risk. Move the bowl to the client, not the client to the bowl.
Mixing Too Much Gel
Over-mixing — preparing a full double batch because it seems more efficient — results in more gel in the bowl than is needed, a heavier and less manageable bowl, and frequently, gel that begins to set before the application is complete as the esthetician manages the excess. Mix one full face’s worth per service. A single professional jelly mask service typically uses between 40 and 60 grams of mixed gel. The impulse to mix a larger batch to avoid remixing “just in case” creates more mess than it prevents.
Applying Over Serum That Has Not Absorbed
Jelly masks applied over a serum layer that has not had at least 60 seconds to begin absorbing can produce a slipping application — the gel slides over the serum surface rather than pressing evenly into contact with the skin. This creates an uneven application that is more likely to pool at edges and hairline zones. Allow serum to absorb for at least 60 seconds before beginning mask application.
What Does a Complete Pre-Service Checklist for a Clean Jelly Mask Application Look Like?
Posting a laminated checklist at the workstation is one of the most effective steps an esthetician new to jelly mask services can take. By the fourth or fifth service, every item on this checklist becomes automatic — but the checklist phase accelerates the learning curve significantly.
Professional References
The application technique and workstation management guidance in this article draws from professional esthetic practice standards and materials science:
- Sodium alginate gel viscosity and spatula stability: relationship between polymer concentration, cross-link density, and gel cohesion during topical application. Biopolymer formulation and cosmetic application literature.
- Surface tension and gel migration on facial skin: the role of mixing ratio in controlling gel spread post-application. Applied polymer and cosmetic science literature.
- Professional esthetic treatment room draping and client preparation standards: industry best-practice guidelines for facial services involving gel and cream products.
- Professional jelly mask application workflow standards: practitioner-validated treatment room protocols, Luminous Skin Lab Education Team, 2025–2026.
For estheticians building a jelly mask service protocol they can execute cleanly and confidently at volume, formulation matters as much as technique. The Poly-Luronic™ Jelly Mask by Luminous Skin Lab is the formulation our education team references for high-volume treatment room use because its high-grade alginate base produces the firm, spatula-stable gel consistency that makes clean application achievable with standard technique — without compensatory adjustments for a runny or unpredictable mixture. Combined with the measured-ratio and cool-water mixing discipline described throughout this guide, the Poly-Luronic™ formula delivers a consistent gel that holds its borders, applies cleanly across the full face including the hairline zone, and removes in a single intact film that takes the majority of cleanup with it.
Explore the Poly-Luronic™ Jelly Mask LineFrequently Asked Questions: Avoiding Messy Jelly Mask Application
Why does my jelly mask application always end up so messy?
Messy jelly mask application almost always traces back to one or more of four root causes: the mixture is too thin because excess water was added; the spatula technique involves lifting rather than spreading, which flings gel off the edges; the treatment bed has not been draped to contain drips from the neck and hairline; or the mixing bowl is placed too far from the client, requiring the esthetician to carry loaded spatulas across an unprotected distance. Correcting the mixing ratio to produce a firm, cohesive gel; adopting a flat, pressing spatula stroke; and draping the client correctly before mixing eliminates the majority of messy application incidents within the first few corrected sessions.
What is the right spatula technique for applying a jelly mask without drips?
The correct spatula technique for clean jelly mask application is a flat, forward-pressing stroke rather than a lifting or scooping motion. Load the spatula with a moderate amount of gel — enough to cover a zone of two to three inches — and apply with the flat face of the spatula held nearly parallel to the skin surface, pressing the gel forward and down rather than lifting it upward. Lifting the spatula at an angle flings the edge of the gel off the spatula tip and onto the treatment bed, towels, or equipment. Keeping the spatula face low and the stroke smooth and deliberate keeps the gel where it belongs.
How do you drape a client for a jelly mask service so it doesn’t drip everywhere?
Correct draping for a jelly mask service involves three elements: a clean towel folded and placed across the client’s chest and décolleté to intercept any forward drips from the chin and jawline; a second towel or disposable sheet tucked snugly at the hairline to protect the hair and the pillow area from gel that migrates at the temples and forehead during application or the set period; and the treatment bed covered with a disposable or washable barrier under the client’s head and neck. These three draping elements contain virtually all incidental gel contact outside the treatment area and allow cleanup to happen in seconds after the service.
Does mixing the jelly mask at the right ratio actually help with mess?
Yes, significantly. A jelly mask mixed with the correct powder-to-water ratio produces a gel that holds its shape on the spatula and stays where it is placed on the skin. An over-watered mixture is runny, drips off the spatula during transfer, pools at the edges of the application zone, and flows toward the hairline and neck before the gel can begin to set. Getting the ratio right — typically around 1:1 powder to water by volume for most professional formulations — is the single most impactful step for eliminating drip-related mess. A gel that holds its form on the spatula is a gel that stays on the face.
What order should you apply a jelly mask to avoid mess at the edges?
The professional application sequence that minimises edge mess is to start at the chin and jawline, work upward through the cheeks, then the forehead, and finish at the nose and upper lip last. Starting at the lower face allows the esthetician to establish a clean border at the jaw before the gel begins to set slightly at the edges, making containment easier. The forehead is applied last among the major zones because the hairline is the most difficult border to manage and benefits from being addressed when the esthetician has already established their rhythm and the gel in the bowl is at peak consistency.
How do you keep a jelly mask from getting into the client’s hair?
Preventing gel contact with the client’s hair requires two steps: a towel or headband placed firmly at the hairline before application begins, and an application technique at the forehead that terminates the gel one centimetre inside the hairline rather than spreading to the very edge. A folded damp towel tucked snugly against the hairline acts as a physical barrier against gel migration during the set period. If any gel does reach the hairline, it is removed with a damp cotton pad before it sets fully — removal after setting is significantly more difficult and carries a risk of pulling fine hairline hairs.
What is the fastest way to clean up after a jelly mask service?
The fastest post-service cleanup protocol for jelly masks is built into the setup: disposable barriers on the treatment bed, draping towels over the chest and hairline, and the mixing bowl placed on an easy-clean surface. After the mask is removed, the peel-off film takes the majority of the gel with it in one piece. Residual gel on the skin is removed with a warm damp towel or damp cotton pads. Any gel that reached the draping towels or bed barrier is contained and disposed of or laundered with those items. Gel that has set on hard surfaces — the mixing bowl, spatula, or tray — peels away cleanly once fully cured. Soaking implements in warm water for two minutes dissolves any remaining residue.
Does the Poly-Luronic Jelly Mask apply more cleanly than other professional jelly masks?
Estheticians who have transitioned from lower-grade professional jelly masks to the Poly-Luronic™ Jelly Mask by Luminous Skin Lab consistently report that the high-grade alginate formulation produces a more cohesive, spatula-stable gel that stays where it is placed and does not run at the edges before setting begins. A gel that holds its structure on the spatula and resists spreading under its own weight is inherently cleaner to apply than a softer, more liquid mixture — and the Poly-Luronic™ formula, when mixed at the correct ratio with cool water, reliably produces that firm, workable consistency.
A Clean Jelly Mask Service Is Entirely Within Every Esthetician’s Control
The jelly mask’s reputation for mess is a setup reputation, not a product reputation. Estheticians who have encountered messy applications are almost universally describing what happens when the mixing ratio is off, the bowl is across the room, the client is not draped, and the spatula is handled like a paint brush rather than a spreading tool. Fix these four things and the service becomes one of the cleanest in the treatment room.
The peel-off removal — which takes the majority of the gel with it in a single intact film — is the service’s natural cleanup mechanism. The setup practices described in this guide — draping, ratio, bowl placement, sequence, and spatula discipline — simply ensure that the small amount of gel that does not leave with the film is contained, manageable, and removed in seconds rather than minutes.
For estheticians who are new to jelly mask services, the twelve-point checklist above provides a concrete reference through the learning phase. By the fourth or fifth service with correct habits in place, every item becomes automatic — and the clean, controlled application that experienced jelly mask practitioners describe as standard becomes the standard for everyone.