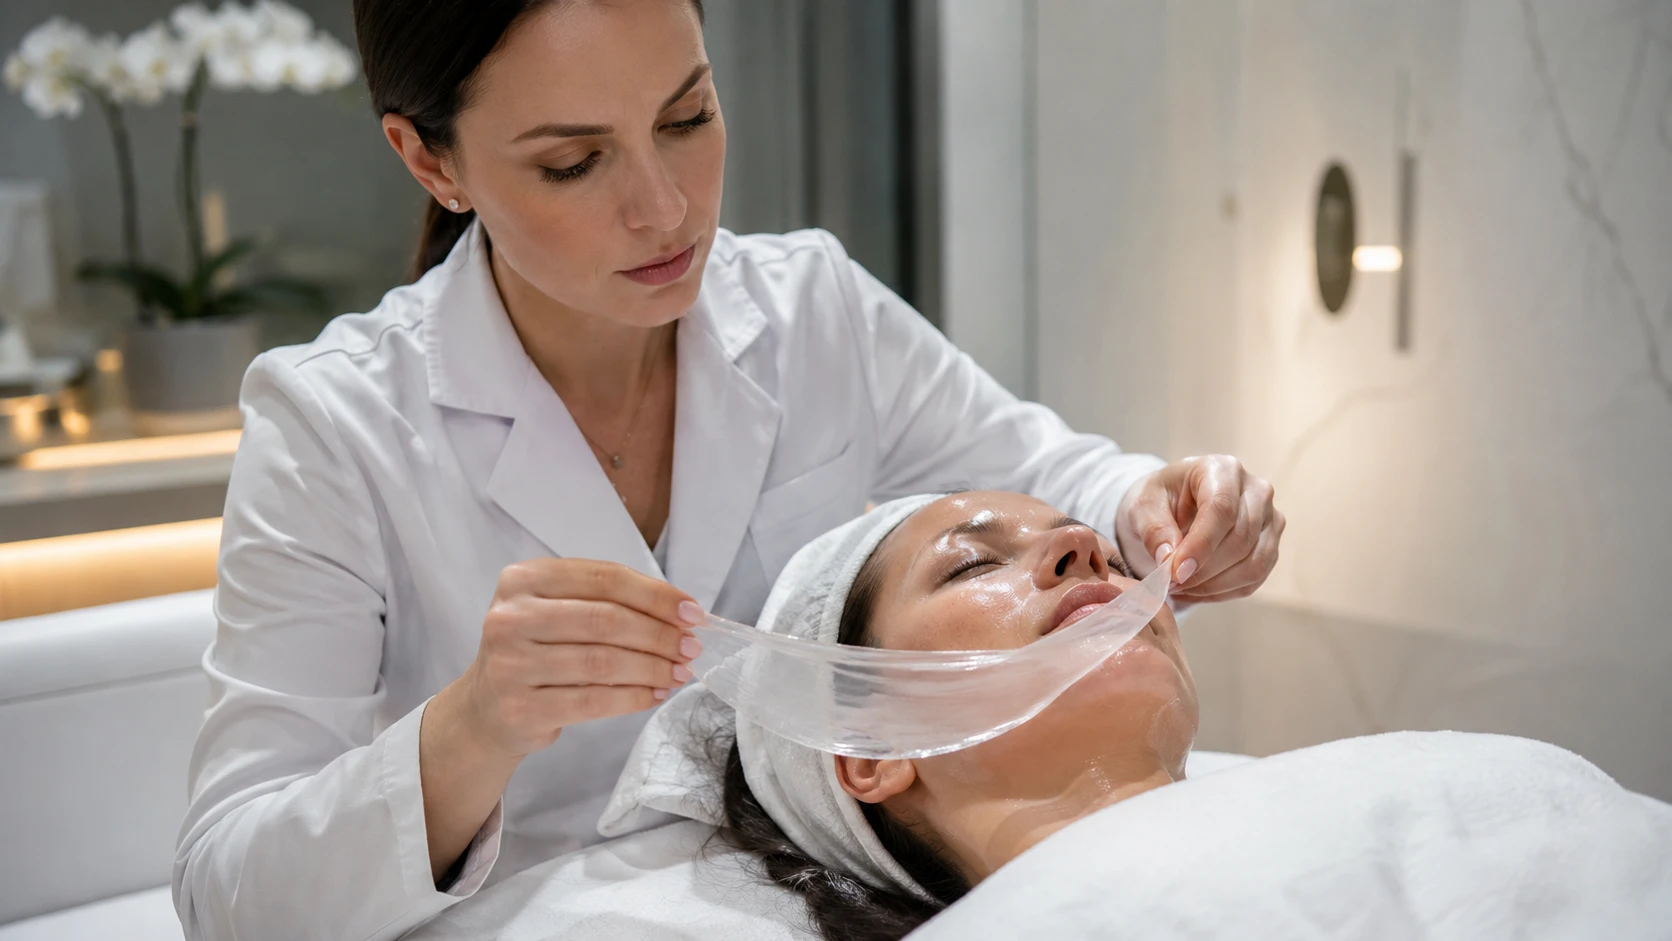
How Do You Remove a Jelly Mask in One Piece?
Single-piece jelly mask removal requires three foundations: the mask must be fully set, it must have been applied at consistent thickness, and the removal technique must use a low peel angle of 30 to 45 degrees rather than pulling straight up from the face. Loosen the perimeter at the jaw with a silicone spatula, grip the chin edge, and peel steadily back toward the forehead in one continuous motion. Rushing, lifting at a steep angle, or beginning removal before the mask has fully crosslinked throughout its depth are the primary causes of tearing.
- The mask is ready to remove when the surface is matte and no longer glossy, a light tap produces a firm spring-back response with no stickiness, and the edges have begun to pull slightly away from the skin boundary — typically 12 to 18 minutes from the end of application.
- Start at the jaw or chin — the lowest point of the application where the gel releases most cleanly — not at the nose bridge or center of the face where the gel is thickest.
- Hold the leading edge close and nearly parallel to the face (30–45 degrees) to distribute tension across the full film width rather than concentrating stress at a single point.
- A steady, moderate pace is correct — neither a slow cautious crawl that allows the gel to re-adhere ahead of the peel, nor a fast snap that exceeds the film’s tensile capacity.
- Gauze embedded in the gel during application provides a structural support mesh that significantly improves single-piece removal success on masks that are thin or slightly under-set.
- Removal failure — tearing, fragmentation, or residue — is always diagnosable: under-set timing, uneven application, compromised gel matrix from premature setting, or incorrect technique. Each has a specific correction.
The single-piece removal is the moment a jelly mask service is remembered. More than the cooling sensation at application, more than the visible skin transformation, the clean, continuous lift of a fully set gel film from the face — revealing freshly hydrated, luminous skin beneath — is what clients photograph, describe to their friends, and book again to experience. It is also a clinically meaningful quality signal: a mask that lifts as a single intact piece tells an esthetician that the formulation performed as intended, the dwell time was correct, and the gel matrix maintained its structural integrity throughout the treatment window.
A mask that tears, fragments, or must be wiped off in sections tells the same story in reverse. It signals that something in the preceding steps — mixing, application, timing, or technique — did not meet the conditions that professional jelly mask chemistry requires. Understanding those conditions, and developing the technique to work within them, is what makes single-piece removal a reliable outcome rather than a fortunate accident.
This guide covers everything that determines whether a jelly mask removes cleanly: the gel chemistry that underlies removal integrity, how to assess correct set before removal begins, the step-by-step removal technique with the specific parameters that matter, gauze as a structural aid, and the complete diagnosis guide for every failure mode. It is designed to give estheticians not just a procedure to follow, but a full understanding of why each step in that procedure is calibrated the way it is — so that when conditions vary, the technique adapts correctly rather than failing.
What Determines Whether a Jelly Mask Removes in One Piece
- Single-piece removal is determined before removal begins — by correct mixing, consistent application, and correct dwell time. Technique at removal can only work with what the preceding steps have produced.
- The 30-to-45-degree peel angle is the single most impactful technique variable. Steep-angle peeling (above 60 degrees) causes tearing even in a perfectly set mask by concentrating stress at a single stress point.
- Remove too early and the internal gel matrix lacks the crosslink density to hold together under peel tension. Remove too late and over-dried edges become brittle and fracture.
- Begin at the jaw — always. The chin and jaw edge is where the gel releases most cleanly from the skin boundary in the majority of formulations.
- A steady, uninterrupted peel pace is essential. Stopping mid-peel allows the freed gel edge to contract and adhere again, creating a new stress point that tears when re-lifting is attempted.
- Gauze is the most reliable tool for improving removal integrity in challenging conditions — but it must be embedded in the gel during application, not placed on top afterward.
- Every removal failure mode is diagnosable. Understanding the specific pattern of failure — where the tear starts, how it propagates, what the gel texture feels like — identifies the root cause and the correction.
Why Single-Piece Removal Matters: Both the Clinical and the Experiential Dimensions
In a treatment room context, single-piece jelly mask removal carries significance on two distinct levels that are worth understanding separately, because each one informs a different aspect of professional practice.
The Clinical Dimension: Removal Integrity as a Formulation Quality Signal
A jelly mask that removes as a single intact piece demonstrates that the sodium alginate gel matrix achieved uniform crosslink density throughout its depth and width. That uniform structure indicates that the mixing ratio was correct, the water temperature and room conditions produced even gelation kinetics, and the application was consistent enough to create a structurally homogeneous film. In other words, clean single-piece removal is not just an aesthetic outcome — it is evidence that the entire preceding technical sequence performed within its intended parameters.
Conversely, a mask that fragments during removal shows that something in the preceding steps created structural inconsistency within the gel: differential crosslink density from uneven application thickness, a disrupted matrix from premature interface setting, inadequate overall crosslinking from early removal, or brittleness from over-dwell and dehydration. Diagnosing removal failure is therefore one of the most useful feedback mechanisms available to an esthetician who wants to continuously improve their technique and protocol consistency.
The Experiential Dimension: The Signature Reveal Moment
From the client’s perspective, the removal experience is the sensory peak of the jelly mask service. The tactile sensation of the smooth, cool film releasing from the face, the visual reveal of the mask held intact as a single translucent piece, and the immediate perception of hydrated, luminous skin underneath — these combine into a moment that is immediately legible as professional quality. Clients who have experienced clean single-piece removal consistently rate it as a primary reason they rebook the service. Clients who have experienced a fragmented, wiped-off removal frequently describe a sense of disappointment, regardless of how good their skin feels afterward.
This asymmetry — where good removal amplifies the entire service experience and poor removal diminishes it — is why the removal technique is not a secondary consideration in jelly mask practice. It is the culminating moment that either confirms or undermines every preceding step in the treatment.
The Gel Science That Determines Whether a Mask Can Peel Cleanly
Understanding removal integrity at the level of gel chemistry allows estheticians to identify which variable to adjust when a removal problem recurs — rather than changing multiple things at once and not knowing what worked.
Crosslink Density and Film Tensile Strength
The structural integrity of a set jelly mask — its ability to hold together during peel rather than tearing — is a function of crosslink density: how many calcium-alginate ionic bonds have formed per unit of gel volume. At the correct ratio and full dwell time, crosslink density reaches the level where the gel film has sufficient tensile strength to distribute the mechanical load of removal across its full width without fracturing at any single point.
When crosslink density is insufficient — because the dwell time was too short, the ratio had too much water, or premature setting created an inconsistent matrix — the film has structural weak zones that fracture under peel tension before the rest of the film can release. This is why removal technique cannot fully compensate for formulation or timing errors: the tensile capacity of the gel at removal time is determined by chemistry, not by how carefully the esthetician peels.
Application Thickness and Structural Continuity
Removal integrity also requires structural continuity across the full application area. Thin zones — created by uneven brush application, skipped areas, or a mix that was already beginning to thicken during application — are points where the gel film is physically thinner and therefore mechanically weaker. These zones tear during removal even when the surrounding gel has adequate crosslink density, because the local film cannot withstand the same tensile load as a properly thick section.
Consistent application depth across all facial zones is therefore a prerequisite for reliable single-piece removal, not a stylistic refinement. Even 2 to 3 millimeters of consistent thickness across the full face produces a structurally sound film. Irregular application that ranges from 1 millimeter to 5 millimeters across different zones creates a film that will tear at the thinnest points regardless of technique at removal.
Why Peel Angle Changes the Force at the Fracture Point
The physics of film peeling explain why the 30-to-45-degree angle is not arbitrary. When a flexible film is peeled at a low angle parallel to the surface it is adhered to, the peel force is distributed across the full width of the film’s leading edge — the area in contact with the substrate ahead of the peel front is large, and the mechanical load per unit area at the fracture point is low. The film stretches slightly rather than snapping.
At a 90-degree angle (straight up): All the mechanical force concentrates at a single stress point at the peel front. The load per unit area at that point is maximized. The gel fractures at the weakest point in its vicinity regardless of how strong the overall film is.
At 30–45 degrees: The same total force is distributed across a much wider area of the peel front. The load per unit area is low enough that even a moderately set film can accommodate it without fracturing, as long as the overall crosslink density meets the minimum structural threshold.
This is why technique alone can sometimes salvage a slightly under-set mask — a perfectly executed low-angle peel reduces the fracture risk enough to achieve a clean removal in conditions that would tear under steep-angle technique. It also explains why skilled estheticians develop a feel for the angle intuitively: the gel communicates through resistance whether the angle needs adjustment before a tear occurs.
Adhesion to Skin and the Role of Moisture Content
The adhesive force between a set jelly mask and the skin surface is primarily physical rather than chemical — the gel film conforms to the micro-texture of the skin surface during setting, creating mechanical interlocking between the gel and skin cells. As the mask dwell time extends beyond the optimal removal window, two competing effects occur: the gel continues to crosslink and strengthen (beneficial), but the surface moisture content decreases as the gel loses water to the environment (detrimental). An over-dried mask surface becomes brittle at the edges, loses flexibility, and fractures rather than stretching during the early peel phase. This is why both early removal (insufficient crosslinking) and excessively late removal (over-drying) produce tearing, although by different mechanisms.
How to Assess Whether a Jelly Mask Is Ready to Remove
Correct timing is the most important determinant of removal success that an esthetician controls at the removal stage. Attempting to remove a mask before the gel has reached structural integrity throughout its depth is the single most common cause of mid-peel tearing in professional practice. The readiness assessment takes 10 to 15 seconds and prevents the majority of timing-related removal failures.
- Surface appearance: The mask surface is visibly matte — no longer glossy or shiny. A glossy surface indicates the gel is still in an active crosslinking phase and is not yet film-stable. Matte appearance indicates the surface layer has reached gel maturity.
- Tactile response: A light tap with a clean fingertip at the center of the forehead (the last area to complete crosslinking in most full-face applications due to slightly cooler skin temperature in that zone) produces a firm, spring-back response with no stickiness, no give, and no surface impression left. If the tap leaves a faint impression or feels tacky, wait 2 minutes and reassess.
- Edge retraction: The gel film has begun to pull slightly away from the skin boundary at the jaw and temples — a visible micro-gap of 1 to 2 millimeters between the edge of the gel and the adjacent skin. This retraction is caused by gel shrinkage as crosslinking completes and the film contracts marginally. Its presence indicates the gel has finished its principal setting phase and is ready to release from the skin.
The Timing Reference: 12 to 18 Minutes from Application Completion
Under standard treatment room conditions — room temperature at 68 to 72°F, water temperature at 64 to 68°F, correctly ratioed mix applied to skin that was not freshly steamed — most professional jelly mask formulations complete their principal crosslinking phase 12 to 18 minutes from the end of application. This is the standard professional dwell time range to use as a reference.
Important: the 12-to-18-minute range is a reference, not a removal cue. The three-point readiness assessment above takes precedence over the clock. In a warmer room or with warmer water, readiness may arrive at 10 minutes. In a cooler room with cool water on a thick application, readiness may not arrive until 20 minutes. The three physical indicators are always more reliable than a fixed timer.
What Happens If You Remove Too Early
A mask removed before the forehead and nose bridge — the areas that typically complete crosslinking last — have reached full gel maturity will show a characteristic failure pattern: the jaw and cheek sections lift cleanly, but the mask tears as it approaches the nose bridge or central forehead where the gel is still partially gel-fluid rather than fully crosslinked. This pattern is a clear diagnostic for early removal and is corrected by simply waiting longer — not by changing the technique.
What Happens If You Remove Too Late
A mask left significantly past its optimal removal window — typically more than 25 to 30 minutes for most formulations in a normal treatment room environment — will show a different failure pattern: the edges have become dry and brittle, fracturing immediately when the peel begins, while the center of the mask may still lift reasonably well. Over-dried edge fracture is caused by dehydration of the peripheral gel where it is thinnest and most exposed to air, not by inadequate crosslinking. This is corrected by removing earlier, or by misting the edges lightly with water to restore surface moisture before beginning the peel in cases where the timing has inadvertently extended.
Step-by-Step: The Professional Single-Piece Removal Technique
The following sequence represents the professional standard for jelly mask removal as practiced in high-volume clinical settings. Each step has a specific rationale tied to the physics of film peeling or the anatomy of facial gel adhesion.
-
The nose bridge detail: the most critical navigation point The nose bridge warrants additional focus because it is the most frequent site of mid-peel tearing in practice. The gel conforms to the nose contour during setting, creating a tightly contoured section that is often the thinnest part of the application due to the difficulty of building consistent depth over a curved surface. When the peel front reaches the nose bridge, the combination of tight conformation and thin gel depth creates maximum tearing risk. The correct response is to reduce the peel angle to as close to parallel as possible — even 20 to 25 degrees if necessary — and use the fingertip of the non-peeling hand to gently press the skin of the nose downward and slightly away from the underside of the mask. This reduces the adhesion force the peel must overcome at that point without increasing the mechanical load on the film.
-
Do not stop mid-peel under any circumstances Once the peel has begun, it must continue in an uninterrupted motion to completion. When the esthetician stops mid-peel — to reposition their hands, answer a client question, or assess a resistance point — the freed section of gel contracts slightly as the internal stresses of the peeled film redistribute. This contraction brings the freed gel edge back into contact with the skin surface ahead of the peel front, where it partially re-adheres. When peeling resumes, this re-adhered section creates a new stress concentration point that is significantly more likely to tear than the original gel. If a stop becomes unavoidable, do not attempt to continue from where the peel left off — re-loosen the re-adhered section with a spatula and re-establish the peel from a fresh free edge.
-
The presentation moment: its professional value is not incidental Holding the removed mask intact between both hands and presenting it to the client before setting it aside is a deliberate professional communication. It signals — without verbal explanation — that the treatment performed exactly as intended. Most clients have not seen their own face-shaped gel mask before; the moment of recognition as they see the intact film, understand what it is, and notice the glow on their own skin beneath it is the experiential climax of the service. High-performing estheticians build this moment into their service design deliberately, not as an afterthought.
Estheticians incorporating Poly-Luronic™ Jelly Masks by Luminous Skin Lab into LED-adjunctive protocols — where the mask is applied and the LED panel is positioned immediately overhead during the dwell period — report one specific technique refinement that consistently improves single-piece removal in this context: beginning the peel slightly later than the standard 12-to-15-minute window when the LED session runs a full 15 minutes.
Because the LED panel maintains the facial environment at a marginally cooler temperature than the open treatment room (the panel itself does not generate significant heat, but it blocks air circulation over the face), the outer gel surface tends to retain more moisture and the crosslinking kinetics at the skin interface are slightly slower than in an unobstructed room environment. Waiting until 16 to 18 minutes from application completion — regardless of when the LED session ends — before beginning the readiness assessment produces consistently better three-point check results and cleaner single-piece removal than the standard 12-to-15-minute reference in this specific protocol context. The Poly-Luronic™ formulation’s high-grade alginate base means the gel does not over-dry or become brittle at 18 minutes, which allows this extended dwell without penalty.
Gauze as a Structural Support: When to Use It and How It Affects Removal
Professional gauze used in jelly mask application is one of the most practical tools for improving single-piece removal reliability in challenging conditions. Understanding what it does mechanically, and when it genuinely helps versus when it is unnecessary, allows estheticians to make an informed protocol decision rather than using it habitually or avoiding it out of unfamiliarity.
What Gauze Does Within the Gel Matrix
When a single layer of professional gauze is placed over the client’s face before the jelly mask gel is applied on top, the gel saturates and embeds the gauze fiber network during application. As the gel sets, the gauze becomes an integral structural component of the gel film — a continuous reinforcing mesh that holds the gel together laterally across its full width. When removal begins, the tensile load of the peel is distributed not only across the gel matrix itself but also across the gauze fiber network, which has significantly higher tensile strength than the gel alone. The result is a film that can accommodate more peel tension before fracturing — meaningfully improving single-piece removal probability in cases where the gel might otherwise tear.
When Gauze Is Most Valuable
Estheticians working with multiple jelly mask brands find gauze most valuable in the following conditions: when using a formulation whose alginate quality is inconsistent between batches; when applying the mask in a high-temperature environment where some degree of premature setting during application is difficult to fully prevent; when the client has prominent facial contours (deep nasolabial folds, prominent brow ridges) that create application thickness variation; and when training new estheticians whose application technique has not yet achieved consistent depth across the full face. In all these conditions, gauze provides a structural safety net that makes successful single-piece removal more reliable regardless of the underlying variable.
The Trade-Off: Gauze and Humectant Delivery
Gauze introduces a small trade-off that is worth understanding. The gauze layer sits between the gel and the skin surface, which slightly reduces direct gel-to-skin contact during the dwell period. For masks where the primary clinical goal is humectant delivery — particularly formulations containing PGA and HA, where the occlusive layer’s direct contact with the skin surface is part of the delivery mechanism — the gauze layer marginally reduces the efficiency of that contact. For most clinical applications, this trade-off is small and well worth the removal reliability improvement. In post-treatment protocols where maximizing humectant delivery is the primary clinical priority, experienced estheticians with consistent application technique may prefer to omit gauze and rely on technique for removal integrity.
Critical Gauze Placement Rule
Gauze must be placed on the bare skin before gel application, not on top of a completed application. Gauze placed over an applied gel layer provides no structural reinforcement because it does not become embedded in the gel matrix — it merely sits on the surface and will lift off independently during removal, providing no benefit and complicating the peel. The sequence is always: drape gauze on face → apply gel on top of gauze → allow to set → remove as one piece with gauze fully embedded within the gel film.
Diagnosing Removal Failure: What Each Failure Pattern Tells You
When removal does not produce a clean single-piece peel, the pattern of failure — where the tear begins, how it propagates, what the gel texture felt like during the peel — is diagnostic. Understanding these patterns converts removal failure from a frustrating mystery into a solvable operational problem.
What to Do When Removal Fails Mid-Service
When removal fails and fragmentation has already occurred, the professional response is to work methodically through the remaining sections. Use a silicone spatula to loosen each fragment from its edges, reduce the peel angle as far as possible for each section, and remove the face in a series of as-large-as-possible sections rather than wiping. Even three or four large sections is a better outcome than a wipe-off — it preserves more of the tactile experience for the client. After all gel is removed, assess the skin, apply any post-removal protocol product, and make a brief, forward-looking acknowledgment to the client if the failure was noticeable: “The gel behaved a little differently today — I’ll have this perfectly dialed in for your next visit.” Confidence without over-explanation is the correct professional register.
Professional and Scientific References
The material in this article draws on applied polymer physics, alginate biomaterial science, and professional esthetics application practice:
- Peel mechanics of flexible adhesive films: the relationship between peel angle and stress distribution at the peel front. Applied mechanics and adhesion science literature. Low-angle peeling distributes load across a wider contact zone; steep-angle peeling concentrates stress at a minimum contact area.
- Sodium alginate crosslink density as a function of dwell time, temperature, and calcium ion availability. Biomedical hydrogel and polymer chemistry literature. Relationship between gel maturity and tensile integrity at peel forces.
- Gel dehydration kinetics: moisture loss rate from alginate gel films at varying humidity and temperature. Food science and biomaterial literature. Over-drying and edge brittleness as a function of extended dwell time.
- Gauze as a structural reinforcement matrix in alginate-based facial mask systems. Professional esthetics application practice; medical wound-care dressing literature on alginate-gauze composite systems.
- Professional jelly mask application and removal technique standards. Internal education resources, Luminous Skin Lab; professional esthetics practice literature.
[[DEVELOPER OPTIONAL]] — Expand with specific DOIs upon editorial review.
For estheticians who want a professional jelly mask formulation where removal integrity is built into the gel chemistry rather than dependent entirely on technique, the Poly-Luronic™ Jelly Mask by Luminous Skin Lab is the formulation our education team references most frequently in removal technique and protocol design contexts. The pharmaceutical-grade sodium alginate base produces a gel with the specific combination of tensile strength and flexibility that single-piece removal requires — firm enough to hold structural integrity under low-angle peel tension, flexible enough to navigate facial contours without fracturing. Practitioners consistently describe the removal experience as the most immediately noticeable quality difference when transitioning from lower-grade formulations — and the one that clients reference unprompted as a reason to rebook.
Explore the Poly-Luronic™ Jelly Mask LineFrequently Asked Questions: Jelly Mask Removal Technique
How do I get a jelly mask to come off in one piece?
Single-piece removal requires three things to be correct: the mask must be fully set (firm and matte on the surface, no longer cool or tacky to a light tap), the application must have been thick and even enough to create a structurally continuous film, and the removal technique must use a low peel angle of 30 to 45 degrees held nearly parallel to the skin surface rather than pulling straight up. Start at the jaw or chin edge, loosen the perimeter with a silicone spatula or clean fingertip, then peel steadily back toward the forehead in one continuous motion. Rushing the peel or lifting at a steep angle are the most common technique causes of tearing.
What angle should I peel a jelly mask at?
The correct peel angle for professional jelly mask removal is 30 to 45 degrees from the skin surface — meaning the leading edge of the mask is held close and nearly parallel to the face as it is peeled back. This low angle distributes the tension across the widest possible area of the gel film, allowing the internal gel matrix to stretch slightly before releasing from the skin. Pulling at a steep angle (60 to 90 degrees) concentrates all the mechanical force at a single small stress point, causing tearing in all but the most perfectly set masks.
How do I know when a jelly mask is ready to remove?
A correctly set jelly mask is ready to remove when three conditions are all present: the surface is visibly matte and no longer glossy; a light tap with a clean fingertip produces a firm, spring-back response with no stickiness or give; and the mask edges have visibly pulled slightly away from the skin boundary at the jaw and temples. The timing for most professional formulations is 12 to 18 minutes from the completion of application. The three physical indicators are more reliable than a fixed timer.
Why does my jelly mask keep tearing when I try to peel it off?
Tearing during removal has four primary causes: removing too early before the gel has fully crosslinked throughout its depth; uneven application thickness that created structurally thin zones; premature setting during application that disrupted the gel matrix; or a peel angle that is too steep, concentrating stress at a single point rather than distributing it across the film. Diagnosing which cause is present guides the correction: timing issues require waiting longer; application issues require technique refinement; angle issues are corrected immediately by lowering the peel angle and slowing the pace.
Where do I start when removing a jelly mask?
The standard professional starting point for jelly mask removal is the jaw or chin edge — the lowest point of the application where the gel typically releases most cleanly. Use a silicone spatula or clean fingertip to gently loosen 2 to 3 centimeters of the perimeter edge at the jaw on both sides, then lift the chin section as the leading piece and peel steadily upward and back toward the forehead. Avoid starting at the nose bridge or center of the face where the gel is typically thickest and most adhered.
Does using gauze make it easier to remove a jelly mask in one piece?
Yes, when used correctly. A single layer of professional gauze placed over the face before the jelly mask gel is applied acts as an embedded structural support within the gel layer. The gauze fibers create a continuous mesh that holds the gel together during removal, allowing even a slightly under-set or thin mask to lift as a single piece where it might otherwise fragment. The gel must be applied on top of the gauze during application — gauze placed on top of a completed mask application provides no structural benefit.
What should I do if the jelly mask breaks apart during removal?
If the mask tears mid-peel, stop immediately and reassess before continuing. Use a silicone spatula to re-loosen the remaining perimeter, reduce the peel angle as close to parallel with the skin as possible, and peel more slowly. If large sections have already fragmented, remove them section by section working from edges toward the center. After full removal, wipe any residue with a damp warm towel, assess the skin, and note the failure cause for protocol adjustment. Do not attempt to press fragments back down and re-peel.
Does the Poly-Luronic™ Jelly Mask peel off cleanly in one piece?
Yes — when mixed at the correct 2:1 ratio with room-temperature water and allowed to reach its full set window of 12 to 15 minutes, the Poly-Luronic™ Jelly Mask by Luminous Skin Lab consistently produces the firm, flexible gel film required for single-piece removal. Practitioners describe the peel as one of the most satisfying removal experiences in professional jelly mask use — a continuous, clean lift that leaves no residue and reveals immediately visible hydration improvement. The high-grade alginate base creates a gel matrix with sufficient tensile integrity to withstand the low-angle peel without fracturing, which is one of the functional distinctions between pharmaceutical-grade and lower-grade alginate formulations.
The Removal Moment Is Earned Before You Touch the Mask
Single-piece jelly mask removal is the product of everything that came before it — the quality of the formulation, the precision of the ratio, the correctness of the water temperature, the evenness of the application, the discipline of the dwell time. The technique at removal is the final layer, and it is an important one: the right peel angle, the correct starting point, the uninterrupted motion. But technique at removal cannot substitute for what the preceding steps failed to produce.
The good news is that all of these variables are knowable and controllable. Once the esthetic behind single-piece removal is understood — crosslink density, structural continuity, film tensile mechanics, angle-to-stress physics — the path to consistent success is clear: it is a series of specific, manageable decisions made at each stage of the service. Formulation selection, ratio discipline, environmental control, application consistency, dwell time assessment, and then technique at removal in that order.
Estheticians who develop mastery over all six stages find that single-piece removal stops being a goal and starts being an expectation — something that simply happens, every session, as the natural consequence of a protocol executed well from beginning to end. That is the professional standard the jelly mask service rewards when approached as the technical art form it genuinely is.